


The Flashographer’s Handbook: Lighting Techniques for Masterful Shots
Welcome to “The Flashographer’s Handbook,” your comprehensive guide to mastering the art of flash photography and creating stunning images through expert lighting techniques. Whether you’re a novice photographer eager to explore the world of artificial lighting or an experienced shutterbug looking to enhance your skills, this handbook is designed to illuminate the path to captivating and masterful shots.
Understanding Flash Photography
The Basics of Flash
In the realm of photography, understanding the fundamental principles of flash is akin to unlocking a new dimension of creative possibilities. This chapter delves into the essential aspects of how flash works and explores its profound impact on the art of capturing light.
Instant Illumination
Flash photography is characterized by the magic of instant illumination—a brief burst of artificial light that transforms a scene in the blink of an eye. This instantaneous burst of light serves as a powerful tool for photographers, allowing them to freeze motion, capture details in low-light conditions, and shape the mood of their images with precision.
The Dynamics of Instant Illumination:
In the world of photography, timing is everything. Unlike continuous light sources, a flash unit produces light for an extremely short duration, typically measured in fractions of a second. This brief burst is particularly advantageous in scenarios where capturing a specific moment is paramount, such as freezing the motion of a dancer mid-leap or capturing the sparkle in the eyes of a subject.
Advantages of Instant Illumination:
Freezing Motion: Flash’s rapid burst of light is ideal for capturing fast-moving subjects with clarity, eliminating the blur that may occur with longer exposure times.
Low-Light Enhancement: In dimly lit environments, the instantaneous burst of flash compensates for inadequate ambient light, revealing details that might be lost in the shadows.
Versatility in Lighting: The ability to control and shape light in a fraction of a second empowers photographers to sculpt their scenes with precision, adding depth and drama to their compositions.
Technical Considerations:
Understanding the technical aspects of flash duration is crucial for harnessing its potential. Flash duration is the time it takes for a flash to emit light from the moment it begins until it diminishes. Short flash durations are desirable for freezing motion, while longer durations may be used for creative effects.
Practical Tips:
Syncing with Shutter Speed: Ensure proper synchronization between the flash and shutter speed to maximize the impact of instant illumination without risk of exposure issues.
Creative Timing: Experiment with the timing of your flash to capture expressions, movements, and moments that convey the desired emotion in your photographs.
In mastering the art of instant illumination, photographers unlock a dynamic tool that adds a layer of creativity and precision to their craft. As we delve deeper into the world of flash photography, the understanding of this fundamental characteristic will serve as the cornerstone for creating compelling and visually striking images.
Flash, in its essence, is a burst of artificial light that lasts for a fraction of a second. This instantaneous illumination allows photographers to freeze motion, capture details in low-light conditions, and achieve crisp images.
Color Temperature
In the intricate dance of light, color temperature is a key player, shaping the mood and tone of your photographs. As we delve into the color temperature of flash, we uncover the importance of meticulous white balance adjustments and the delicate interplay between the color temperatures of flash and ambient light. This understanding is paramount for achieving images that resonate with natural and lifelike hues.
Understanding Color Temperature:
Color temperature is a numerical representation of the color of light, measured in Kelvins (K). Lower temperatures, around 2000-4000K, tend to produce warm tones, while higher temperatures, around 5000-10,000K, result in cooler tones. Flash units, like other light sources, have their own inherent color temperature, which can influence the overall color cast of your images.
Significance of White Balance:
White balance acts as a crucial tool for neutralizing color casts and ensuring accurate color reproduction in your photographs. By adjusting the white balance settings on your camera, you can counteract the color temperature of the light source and achieve true-to-life colors.
Flash Color Temperature:
Flash units typically have a color temperature close to daylight, commonly around 5500K. However, this can vary between different flash models and manufacturers. Understanding your specific flash unit’s color temperature allows you to make informed decisions when setting your camera’s white balance.
Interplay with Ambient Light:
In scenarios where ambient light and flash coexist, harmonizing their color temperatures becomes imperative. Failure to do so can result in images with unnatural color shifts. Balancing the color temperatures ensures that your subject appears seamlessly integrated into the scene, regardless of whether the light comes from the flash or the environment.
Practical Tips:
Custom White Balance: Consider using custom white balance settings based on the specific conditions of your shoot, especially when mixing flash with ambient light.
Gel Filters: Experiment with color gel filters on your flash to match its color temperature with ambient light, achieving a cohesive and natural look.
Post-Processing Adjustments: Fine-tune color temperature during post-processing to achieve the desired visual impact, maintaining a balance between creative intent and accurate color reproduction.
As we navigate the colorful spectrum of flash photography, mastering the nuances of color temperature empowers photographers to craft images that not only freeze a moment in time but also encapsulate the authentic and vivid essence of the scene. The journey into the realm of color is a voyage of artistic expression, where understanding becomes the compass guiding you toward captivating and natural-looking photographs.
.
The Flash Unit: Anatomy and Operation
Photography, at its core, is the art of capturing and manipulating light. In the realm of flash photography, the flash unit stands as a beacon of controlled illumination. Let’s embark on a journey through the anatomy and operation of a flash unit, dissecting its components to lay the groundwork for wielding light with precision and creativity.
Components of a Flash Unit
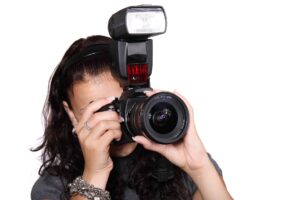
Flash Head:
Emitter of Light: The flash head is the business end of the unit, responsible for emitting the burst of light. It may be adjustable, allowing you to direct the light where needed.
Zoom Functionality: Some flash heads offer zoom capabilities, enabling photographers to narrow or widen the spread of light to match the focal length of the lens.
Reflector:
Bounce and Spread: The reflector influences the direction and spread of light. It can be rotated or tilted to bounce light off surfaces or spread it more evenly across the scene.
Controls:
Power Settings: Flash units come with adjustable power settings, allowing you to control the intensity of the flash output. This is crucial for achieving proper exposure and creative effects.
Mode Selector: Flash units offer various modes such as manual, automatic, and TTL (Through-The-Lens), providing flexibility in how the flash operates.
Flash Tube:
Light Source: The flash tube is the light source inside the flash head. When triggered, it emits a brief burst of intense light. Understanding the characteristics of the flash tube aids in predicting and manipulating light behavior.
Modifiers and Accessories:
Attachment Points: Flash units often have standardized attachment points for modifiers and accessories like softboxes, diffusers, and colored gels. These additions allow for creative light shaping.
Battery Compartment/Power Source:
Energy Supply: The power source, usually in the form of batteries, provides the energy required to generate the flash. Some units may also have external power options for extended shooting sessions.
LCD Display and Controls:
User Interface: Flash units are equipped with LCD displays and controls for easy navigation of settings. Understanding this interface is crucial for efficient adjustments on the fly.
Triggering Mechanism:
Synchronization: The triggering mechanism synchronizes the flash with the camera’s shutter, ensuring proper timing for optimal exposure. It can be wired or wireless, depending on the flash unit and camera compatibility.
Cooling Mechanism:
Heat Dissipation: Due to the intense nature of the flash burst, some units incorporate cooling mechanisms to prevent overheating during prolonged use.
Flash Foot and Mounting Options:
Attachment to Camera: The flash foot allows you to attach the unit to the camera’s hot shoe. Understanding mounting options is crucial for on-camera flash photography.
Practical Tips:
Familiarize yourself with each component of your flash unit, experimenting with its functionalities to understand how they influence light output.
Explore the compatibility of your flash unit with various modifiers and accessories, as they can significantly enhance your creative capabilities.
By dissecting the anatomy of a flash unit, you not only gain a technical understanding of its components but also acquire the knowledge to manipulate light effectively. Armed with this insight, you can navigate the intricacies of flash photography with confidence, transforming ordinary scenes into captivating visual stories.
Flash Modes
In the symphony of light, flash modes are the notes that compose the melody of your photographic vision. Each mode carries its own rhythm, offering a unique approach to how the flash interacts with your scene. Let’s unravel the mysteries of flash modes, from the simplicity of automatic settings to the precision of manual control, and explore how these modes can be harnessed to suit diverse shooting scenarios.
Automatic Mode:
Intuitive Exposure: Automatic flash mode (often represented as “A” or “Auto”) lets the camera decide the appropriate flash output based on its internal metering system. This mode is user-friendly and ideal for quick snapshots, but it may not provide full creative control.
Manual Mode:
Complete Control: Manual flash mode (often designated as “M”) puts you in the driver’s seat, allowing you to manually set the flash output power. This mode provides precise control over the intensity of the flash, making it suitable for scenarios where creative lighting is paramount.
TTL (Through-The-Lens) Mode:
Intelligent Automation: TTL flash mode utilizes the camera’s metering system to assess the scene and adjust the flash output accordingly. It strikes a balance between automation and manual control, making it an excellent choice for photographers who want some level of automation while retaining creative influence.
Rear Curtain Sync:
Creative Timing: This mode determines when the flash fires concerning the shutter curtain movement. Rear curtain sync is often employed in low-light situations to create trailing light effects behind moving subjects, adding a dynamic element to the image.
Slow Sync:
Balancing Ambient Light: Slow sync flash combines a slow shutter speed with the flash, allowing more ambient light to be captured. It’s beneficial in low-light scenarios, providing a balance between the flash illumination and existing ambient light.
High-Speed Sync (HSS):
Freezing Action: HSS allows the flash to sync with shutter speeds higher than the standard sync limit. This is advantageous for freezing fast-paced action in well-lit conditions, expanding the range of flash usage.
Fill Flash Mode:
Balancing Shadows: In bright outdoor conditions, fill flash helps reduce harsh shadows on subjects by providing a supplementary burst of light. It’s a valuable tool for achieving balanced exposures in challenging lighting situations.
Practical Tips:
Experiment with different flash modes in various scenarios to understand their effects on exposure and creative outcomes.
Consider the mood and atmosphere you want to convey in your images when choosing between automatic, manual, or TTL flash modes.
Familiarize yourself with advanced modes like rear curtain sync and high-speed sync to broaden your creative possibilities.
Flash Sync and Shutter Speed
In the delicate dance between flash and shutter, understanding flash sync and shutter speed is akin to mastering the choreography of light. Let’s explore the intricacies of how these elements converge, ensuring seamless coordination for well-exposed and creatively compelling photographs.
Flash Sync Basics:
Timing is Crucial: Flash sync refers to the coordination between the opening of the camera’s shutter and the firing of the flash. Achieving proper sync ensures that the flash illuminates the scene at the right moment, resulting in a well-exposed image.
Standard Flash Sync Speed:
Synchronization Limit: Cameras have a designated maximum shutter speed at which the flash can sync seamlessly. This standard sync speed is usually around 1/200 to 1/250 seconds, though it varies between camera models.
High-Speed Sync (HSS):
Beyond the Limit: High-Speed Sync extends the range of flash usage by allowing synchronization at shutter speeds exceeding the standard limit. This is advantageous when shooting in bright conditions or when a wider aperture is desired.
Slow Sync:
Balancing Light: Slow sync combines a slower shutter speed with the flash, enabling a balance between ambient light and flash illumination. It’s particularly useful in low-light scenarios, creating a natural and well-balanced exposure.
Rear Curtain Sync:
Creative Timing: Rear curtain sync determines when the flash fires concerning the closing of the shutter curtain. This mode is often used to create dynamic effects by placing the flash burst at the end of a prolonged exposure.
Flash and Continuous Lighting:
Harmonizing Light Sources: When using flash in conjunction with continuous lighting, it’s essential to consider how the different light sources interact. Balancing color temperatures and avoiding conflicts between ambient and flash lighting contribute to cohesive and natural-looking images.
Practical Tips:
Understand your camera’s standard flash sync speed and experiment with high-speed sync to expand your creative possibilities.
Explore the impact of different flash sync modes on the visual narrative of your photographs.
Consider the environmental conditions and the desired creative outcome when choosing between standard sync, high-speed sync, slow sync, and rear curtain sync.
By unraveling the mysteries of flash modes and understanding the delicate synchronization between flash and shutter speed, you equip yourself with the knowledge to orchestrate light in harmony with your creative vision. This mastery transforms your photography into a symphony of visual storytelling, where each note contributes to the creation of captivating and masterful shots.
Syncing with Shutter Speed
In the realm of flash photography, the synchronicity between flash and shutter speed is a delicate dance that shapes the exposure and visual narrative of your images. Let’s dive into the intricacies of flash sync, exploring how it correlates with the camera’s shutter speed, and discover the profound impact synchronization has on the quality of your shots.
Understanding Flash Sync:
Coordinated Timing: Flash sync refers to the precise coordination between the firing of the flash and the opening of the camera’s shutter. Achieving perfect sync ensures that the burst of light from the flash illuminates the scene exactly when the camera captures the image.
Standard Flash Sync Speed:
Synchronization Limit: Cameras have a designated maximum shutter speed, known as the standard flash sync speed, at which the flash can synchronize seamlessly. This limit is typically around 1/200 to 1/250 seconds for many camera models.
Impact on Exposure:
Exposure Control: The synchronization between flash and shutter speed significantly influences the exposure of your images. Proper synchronization ensures that the flash contributes to the exposure, eliminating issues such as dark or unevenly lit areas.
Slow Sync:
Balancing Ambient Light: Slow sync involves combining a slower shutter speed with the flash, allowing more ambient light to be captured. This technique is beneficial in low-light situations, providing a balance between flash illumination and existing ambient light.
Rear Curtain Sync:
Creative Timing: Rear curtain sync determines when the flash fires concerning the closing of the shutter curtain. This mode is often used to create dynamic effects by placing the flash burst at the end of a prolonged exposure, emphasizing the final moments of motion.
Flash and Continuous Lighting:
Harmonizing Light Sources: When using flash alongside continuous lighting, it’s essential to harmonize the color temperatures of both light sources. This ensures a cohesive and natural look in the final image.
Practical Tips:
Be aware of your camera’s standard flash sync speed, and adjust your shutter speed accordingly to achieve proper synchronization.
Experiment with slow sync and rear curtain sync in various shooting scenarios to understand their impact on the visual narrative.
Consider the mood and desired effect in your photographs when choosing between standard sync, slow sync, and rear curtain sync.
High-Speed Sync (HSS)
As the tempo of your photographic journey accelerates, the need for flexibility in flash photography becomes paramount. Enter High-Speed Sync (HSS), an advanced technique that elevates your capabilities by allowing flash synchronization at shutter speeds exceeding the standard limit. Let’s embark on an exploration of HSS, uncovering its mechanics and the scenarios where it emerges as a valuable tool for photographers.
Breaking the Speed Barrier:
Exceeding Limits: High-Speed Sync enables flash photography at shutter speeds beyond the standard flash sync speed, often reaching up to 1/8000 seconds or even higher. This surpasses the traditional limitations imposed by standard sync speeds.
Benefits of High-Speed Sync:
Freezing Fast Action: HSS becomes invaluable in scenarios where fast-moving subjects demand a high shutter speed to freeze motion. This is particularly relevant in outdoor photography, sports, or capturing dynamic events.
Wide Aperture in Bright Conditions: In bright ambient light conditions, photographers may desire a wide aperture to achieve a shallow depth of field. HSS allows for this by enabling the use of high shutter speeds while still incorporating flash illumination.
Implementation and Considerations:
Flash Unit Compatibility: Not all flash units support High-Speed Sync, so it’s essential to ensure compatibility between your camera and flash.
Reduced Flash Power: HSS reduces the power of the flash, meaning it might not be as effective for illuminating subjects at a distance compared to standard sync speeds.
Scenarios for High-Speed Sync:
Outdoor Portraiture: When shooting portraits outdoors in bright sunlight, HSS allows for the use of wide apertures and controlled flash illumination.
Action Photography: Capturing fast-paced action, such as sports or wildlife, benefits from HSS to freeze motion and maintain proper exposure.
Practical Tips:
Check your camera and flash unit specifications to confirm High-Speed Sync compatibility.
Experiment with HSS in various lighting conditions to understand its impact on exposure and creative possibilities.
Be mindful of reduced flash range when using HSS and adjust your shooting distance accordingly.
By delving into the realm of High-Speed Sync, photographers unlock a powerful tool that transcends traditional limitations. This advanced technique adds a dynamic dimension to flash photography, enabling the freezing of fast action and the creation of striking images in challenging lighting conditions. As you integrate HSS into your repertoire, the boundaries of creative expression expand, allowing you to capture moments that unfold at the speed of life.
Impact on Photography
In the intricate interplay of light and shadow, the introduction of flash into photography becomes a transformative force, shaping the visual narrative and unlocking a realm of creative possibilities. Let’s explore how the impact of flash extends beyond mere illumination, adding depth, drama, and an array of artistic dimensions to your images.
Creative Possibilities
Highlighting Subjects Against a Dark Background:
Isolating the Subject: Flash allows photographers to create a stark contrast between the subject and the background by illuminating the subject while leaving the surroundings in relative darkness. This technique is particularly effective for emphasizing the main focal point and creating a captivating visual hierarchy.
Dramatic Silhouettes: By strategically positioning the flash behind the subject, photographers can create captivating silhouettes against a dark backdrop. This technique is often employed for dramatic and artistic portraits, where the play of light and shadow enhances the mood of the image.
Adding Drama and Depth:
Directional Lighting: The controlled nature of flash enables photographers to experiment with directional lighting. By manipulating the angle and intensity of the flash, you can sculpt the subject, accentuating textures and creating dynamic shadows that add drama and dimension to the scene.
Creative Shadows: Flash opens the door to exploring creative shadows that can become integral elements of your composition. Whether casting intriguing patterns or contributing to the overall mood, shadows introduce an additional layer of storytelling to your images.
Freezing Action in Low-Light Conditions:
Capturing Motion: Flash becomes a crucial tool for freezing fast-paced action in low-light conditions. This is particularly valuable in event photography, sports, or any scenario where capturing a decisive moment is paramount. The instantaneous burst of light ensures sharp and detailed images even in challenging lighting situations.
Balancing Ambient Light:
Harmonizing Light Sources: Flash empowers photographers to balance ambient light with artificial light, creating a seamless integration of different light sources. This is essential for achieving natural-looking images in diverse lighting conditions, from sunsets to indoor environments.
Enhancing Details and Textures:
Texture and Contrast: The controlled burst of light from a flash highlights details and textures that might be lost in the shadows or subdued by ambient light. This is particularly beneficial in macro photography, product photography, or any situation where capturing intricate details is a priority.
Practical Tips:
Experiment with off-camera flash and various lighting setups to explore the impact of directional lighting on your subjects.
Consider the mood and storytelling elements you want to convey in your images when choosing between dramatic lighting and more subtle, natural approaches.
Play with flash power settings and modifiers to achieve the desired balance between subject and background illumination.
As you embark on the exploration of flash photography, recognize its potential not just as a source of light but as a versatile tool for crafting narratives, evoking emotions, and pushing the boundaries of creative expression. Whether it’s highlighting a subject against the dark expanse or infusing drama into your compositions, flash becomes a brush with which you paint the canvas of your visual storytelling journey. Embrace the creative possibilities, and let the play of light become an integral part of your photographic signature.
Balancing Light
In the intricate tapestry of photography, the art of balancing light is a skill that distinguishes masterful shots from mere snapshots. Flash, as a versatile tool, plays a pivotal role in achieving this delicate equilibrium, allowing photographers to overcome challenging lighting conditions and ensuring well-exposed images that resonate with visual harmony.
Overcoming Challenging Lighting Conditions:
Low-Light Environments: In situations where natural light is insufficient, such as indoor settings or twilight hours, flash steps in as a powerful ally. By supplementing ambient light with controlled bursts of artificial light, photographers can illuminate subjects, reveal details, and maintain a well-exposed image.
Backlit Scenes: When faced with backlighting that threatens to silhouette the subject, strategically deploying flash can fill in the shadows and balance the overall exposure. This technique is particularly useful for portrait photography against a bright background.
Achieving Natural-Looking Results:
Harmonizing Color Temperatures: Flash allows photographers to harmonize the color temperatures of different light sources. By balancing the color of artificial light with ambient light, you ensure that your subjects appear natural and seamlessly integrated into the scene.
Avoiding Harsh Shadows: Flash provides the means to soften harsh shadows caused by direct sunlight. Whether shooting portraits or capturing intricate details, the controlled illumination from a flash helps achieve a more flattering and even distribution of light.
Creating Depth and Dimension:
Foreground and Background Illumination: Balancing flash with ambient light contributes to a three-dimensional quality in photographs. This interplay of light and shadow creates depth, bringing out the foreground and background elements with clarity and visual interest.
Controlling Contrast: Flash allows photographers to control contrast by lifting shadows and reducing harsh highlights. This ensures a more balanced tonal range, especially in scenes with extreme lighting variations.
Dynamic Lighting Setups:
Multi-Light Setups: Balancing multiple sources of light, both ambient and artificial, opens up possibilities for dynamic lighting setups. This could involve using flash to highlight specific areas of a scene while allowing ambient light to contribute to the overall mood.
Cinematic Effects: In genres like portrait or fashion photography, the careful balance of light can create cinematic effects, adding a touch of drama or elegance to the composition.
Practical Tips:
Understand the ambient light conditions and adjust flash power and settings accordingly to achieve a seamless blend.
Experiment with different flash modifiers, such as diffusers or bounce cards, to achieve a natural and soft look in your images.
Pay attention to the direction and quality of ambient light, and use flash strategically to enhance or supplement it as needed.
As we conclude this immersive journey through the basics of flash photography, you have traversed the foundations that pave the way for your evolution as a flashographer. Armed with insights into the mechanics, modes, and creative possibilities of artificial lighting, you stand at the threshold of a captivating exploration into the world of lighting techniques.
From highlighting subjects against a dark canvas to overcoming challenging lighting conditions with the artful balancing of light, your understanding of flash’s capabilities positions you to embark on a transformative creative journey. As you step forward, remember that mastery in flash photography is not just about technical proficiency but about weaving light into the narrative of your visual stories. Your journey as a flashographer is poised to be a symphony of creativity, where each flash becomes a brushstroke painting the canvas of your photographic expression. May your path be illuminated with the brilliance of well-mastered light, capturing moments that transcend the ordinary and resonate with the extraordinary.
Types of Flashes
In the vast universe of flash photography, understanding the diverse types of flashes is paramount to selecting the right tool for the job. From the ubiquitous built-in camera flashes to the versatile external speedlights and the powerful studio strobes, each type of flash brings its own set of capabilities and creative potential.
Built-in Camera Flashes:
Compact Convenience: Found on most consumer cameras, built-in flashes are compact and convenient for casual snapshots. While limited in power and flexibility, they serve well in certain scenarios where portability is key.
On-Camera Limitations: Built-in flashes are often directly attached to the camera, leading to a flat and harsh lighting effect. Their small size also limits the range and versatility of the flash.
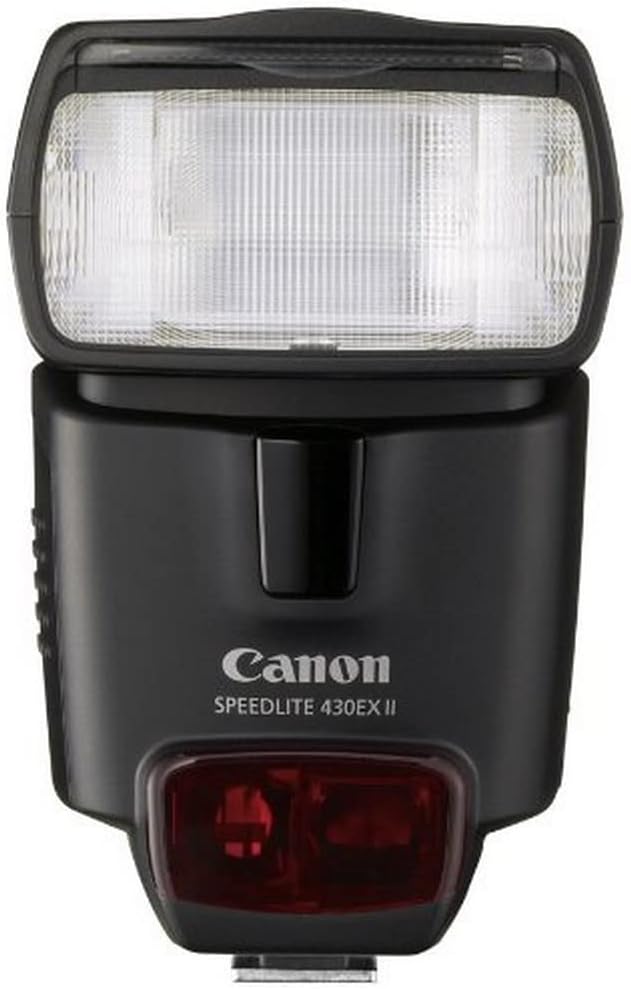
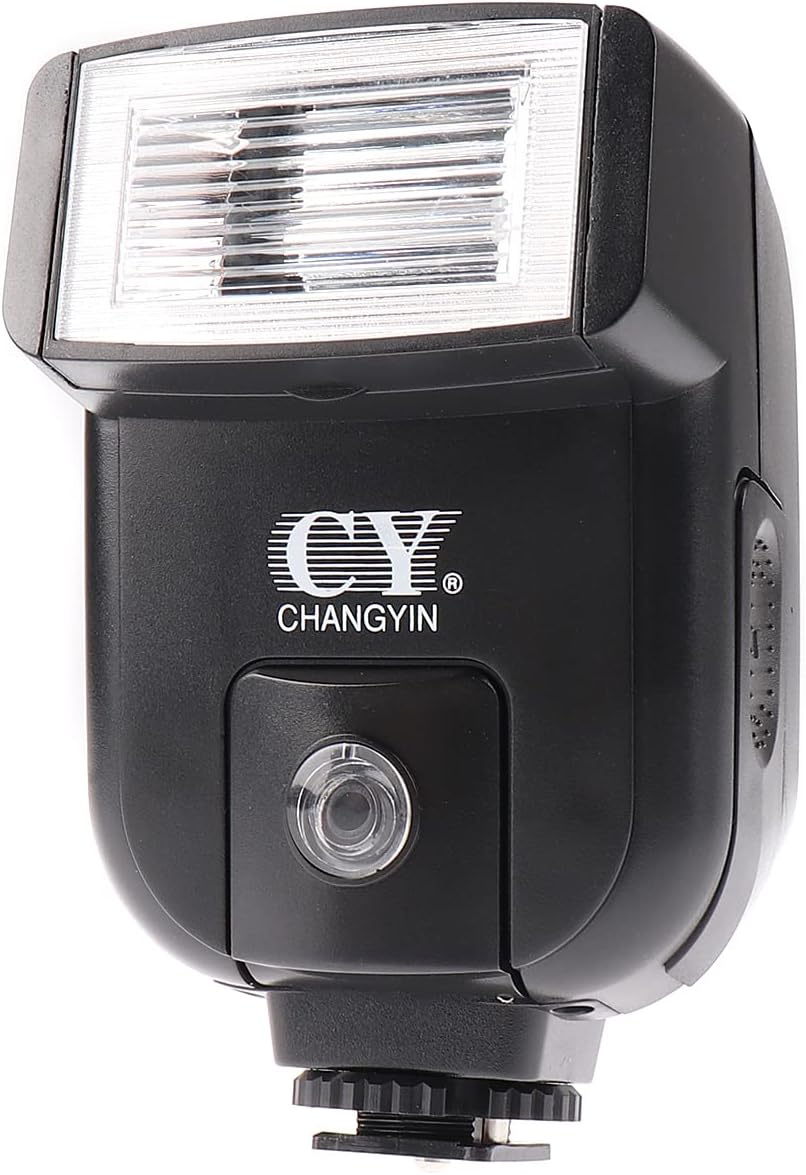
External Speedlights (Hot Shoe Flashes):
Versatile and Portable: External speedlights, commonly mounted on the camera’s hot shoe, offer increased power and versatility compared to built-in flashes. They are portable and well-suited for on-the-go photography.
Off-Camera Capabilities: Many external speedlights can be triggered wirelessly, allowing for off-camera positioning. This flexibility enhances creative lighting possibilities, enabling dynamic and directional illumination.
Modifiability: Speedlights often come with built-in zoom functions and are compatible with various modifiers such as softboxes, diffusers, and color gels, allowing photographers to shape and control the quality of light.
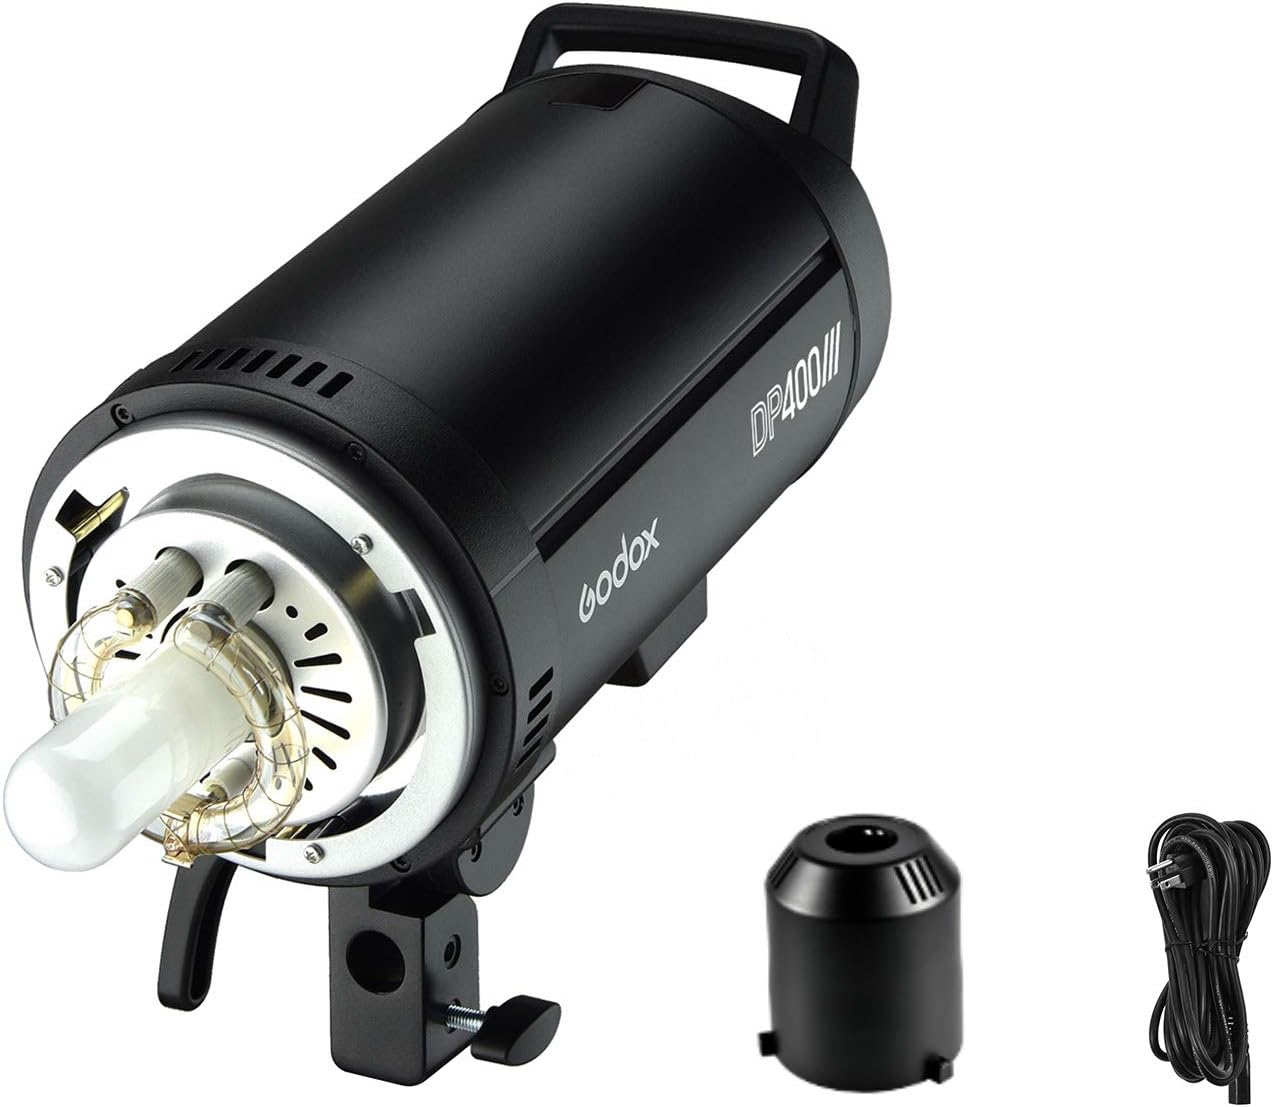
Studio Strobes:
Powerful Lighting Solutions: Studio strobes, also known as monolights or flash heads, are designed for professional studio setups. They offer significantly higher power output compared to speedlights, making them suitable for large spaces and complex lighting setups.
Precise Control: Studio strobes provide precise control over flash duration, power output, and color temperature. This level of control is essential for fine-tuning lighting in commercial photography, portraiture, and product shoots.
Modular Systems: Studio strobes often operate as part of a modular lighting system, allowing photographers to build elaborate setups with multiple lights, modifiers, and accessories.
Ring Flashes:
Distinctive Lighting Style: Ring flashes are specialized flashes that encircle the camera lens, producing a unique, shadowless illumination. They are popular in macro photography and fashion portraiture for their characteristic circular catchlights and even lighting.
Macro Photography: Ring flashes are particularly effective in macro photography, where even and shadow-free lighting is crucial for capturing intricate details.
Practical Tips:
Choose the type of flash based on your specific needs, considering factors such as portability, power, and the intended shooting environment.
Experiment with off-camera flash techniques to explore the creative possibilities beyond the limitations of on-camera flashes.
Familiarize yourself with the features and capabilities of your chosen flash type to maximize its effectiveness in various scenarios.
Flash Sync and Shutter Speed
The intricate dance between flash sync and shutter speed is a fundamental aspect of achieving well-exposed images in flash photography. Let’s unravel the relationship between these two elements, understanding how they synchronize to create visually compelling and balanced photographs.
Understanding Flash Sync:
Coordination of Light: Flash sync refers to the synchronization between the firing of the flash and the opening of the camera’s shutter. Achieving proper sync ensures that the burst of light from the flash contributes to the exposure, resulting in a well-lit image.
Standard Flash Sync Speed:
Synchronization Limit: Cameras have a designated maximum shutter speed at which the flash can sync seamlessly. This standard sync speed is typically around 1/200 to 1/250 seconds for many camera models.
Choosing Shutter Speed: When working within the standard sync speed, photographers can adjust their shutter speed to control ambient light, while the flash provides the primary illumination for the subject.
High-Speed Sync (HSS):
Beyond the Limit: High-Speed Sync (HSS) is an advanced technique that allows flash synchronization at shutter speeds exceeding the standard limit. This is particularly useful in scenarios where a higher shutter speed is required, such as capturing fast motion or using wide apertures in bright conditions.
Flexibility in Lighting: HSS provides flexibility in balancing flash and ambient light, allowing for creative control over the exposure in a broader range of situations.
Practical Considerations:
Outdoor Photography: In bright outdoor conditions, where the ambient light is intense, HSS becomes beneficial for achieving a balanced exposure without overexposing the image.
Action Photography: HSS is invaluable for freezing fast-moving subjects in well-lit environments, providing the necessary shutter speed without sacrificing flash illumination.
Portrait Photography: When shooting portraits with wider apertures in daylight, HSS allows for a shallow depth of field while still using flash to highlight the subject.
Essential Gear for Flashography
Choosing the Right Flash
In the expansive world of flash photography, selecting the appropriate flash unit is a crucial decision that significantly influences the outcome of your images. Whether you’re a novice exploring the realm of artificial lighting or a seasoned photographer seeking to enhance your toolkit, the process of choosing the right flash involves considerations ranging from power and portability to features and compatibility. Let’s delve into guidance on how to navigate this decision-making journey and find the perfect flash for your specific needs.
Determine Your Photography Style:
Portraiture: If your focus is on capturing portraits, a versatile external speedlight with off-camera capabilities can be an excellent choice. It allows for creative lighting setups and provides the flexibility needed for varied portrait scenarios.
Event Photography: For events, consider a powerful external flash with the ability to bounce light off ceilings or walls. This helps in achieving even and flattering illumination in different indoor settings.
Studio Photography: Studio strobes offer the power and control required for studio setups. If you’re engaged in commercial photography, product shoots, or controlled studio environments, investing in studio strobes can elevate the precision of your lighting.
Evaluate Power and Recycle Time:
Power Output: Consider the power output of the flash unit, especially if you often shoot in challenging lighting conditions or need to cover large spaces. Studio strobes typically offer high power, while external speedlights provide a balance between power and portability.
Recycle Time: Faster recycle times are essential, especially in fast-paced shooting scenarios. This is the time it takes for the flash to be ready for the next burst. A shorter recycle time ensures you won’t miss crucial moments.
Assess Portability and Mounting Options:
On-Camera vs. Off-Camera: Depending on your shooting style, decide whether you need a flash that mounts directly on the camera’s hot shoe or one that can be used off-camera for more creative lighting setups. External speedlights are often the preferred choice for off-camera versatility.
Weight and Size: If portability is a priority, consider the weight and size of the flash. Compact external speedlights are convenient for on-the-go photographers, while studio strobes may be bulkier but offer more power.
Explore Compatibility and Features:
Camera Compatibility: Ensure that the flash is compatible with your camera model. Different cameras and flash units may have specific communication protocols, and not all flashes are universally compatible.
Wireless Capability: Look for flash units with built-in or compatible wireless triggering options. This allows for off-camera flash setups without the need for additional cables.
Advanced Features: Consider features such as High-Speed Sync (HSS), TTL metering, and compatibility with modifiers like softboxes and color gels. These features enhance your creative possibilities and control over the lighting.
Set a Budget:
Establish a Budget: Flash units come in a range of prices, from budget-friendly speedlights to high-end studio strobes. Set a budget that aligns with your needs and photography goals.
Consider Long-Term Investment: While budget is crucial, also consider the long-term investment value of the flash. A durable and versatile flash may provide more value over time.
Read Reviews and Seek Recommendations:
User Reviews: Read user reviews and testimonials to gain insights into the real-world performance of the flash unit. Look for feedback from photographers with similar shooting styles and preferences.
Recommendations from Peers: Seek recommendations from fellow photographers, especially those who have experience with the specific type or model of flash you are considering. Personal insights can be invaluable.
Test and Familiarize Yourself:
Hands-On Testing: If possible, test the flash unit in a store or rent it for a trial period. This hands-on experience allows you to assess the user interface, ease of use, and overall performance.
Familiarize Yourself with Features: Take the time to understand the features and functionalities of the flash unit. Familiarity enhances your efficiency and creative control during actual shooting scenarios.
Consider Future Expansion:
Expandability: Choose a flash system that allows for future expansion. This includes compatibility with additional accessories, modifiers, and the ability to integrate more units into your lighting setup.
Upgrade Paths: Consider the availability of compatible upgrades or newer models within the same flash system. This ensures continuity and compatibility as your skills and equipment evolve.
Light Modifiers: Shaping and Controlling Light
In the realm of flash photography, light modifiers stand as indispensable tools, transforming the character and quality of light to suit the photographer’s creative vision. From softening harsh shadows to sculpting the subject with precision, these modifiers play a pivotal role in elevating the impact of artificial lighting. Let’s embark on an exploration of various light modifiers—softboxes, umbrellas, and diffusers—unveiling their unique attributes and the ways in which they shape and control the essence of light.
Softboxes: Crafting Gentle and Even Illumination
Purpose:
Diffused Light: Softboxes are designed to produce soft, diffused light that minimizes harsh shadows and creates a pleasing, even illumination on the subject. This makes them ideal for portrait photography and situations where a gentle, wraparound light is desired.
Characteristics:
Interior Reflective Surface: Softboxes typically have an interior reflective surface that directs and diffuses the light emitted by the flash. The front of the softbox is covered with a translucent fabric that further softens and spreads the light.
Shape Options: Softboxes come in various shapes, including square, rectangular, octagonal, and strip. The choice of shape can influence the catchlights in the subject’s eyes and the overall feel of the lighting.
Usage Tips:
Close Proximity: Position the softbox relatively close to the subject for soft, flattering light. The larger the softbox, the softer the light it produces.
Adjustable Grids: Some softboxes come with grids that allow for greater control over the direction and spread of light. Experimenting with grids can add versatility to your lighting setups.
Umbrellas: Versatile and Bounce-Friendly
Purpose:
Bounce Light: Umbrellas serve as versatile light modifiers that can be used to bounce and diffuse light. They come in various types, including shoot-through and reflective umbrellas, each offering unique lighting characteristics.
Characteristics:
Shoot-Through Umbrellas: These umbrellas have a translucent fabric that allows the flash to shoot through, creating a diffused and directional light source.
Reflective Umbrellas: These umbrellas bounce light off their interior surface before directing it toward the subject. This produces softer, more even lighting.
Usage Tips:
Bounce Direction: Experiment with the direction in which you bounce the light. Bouncing off a wall or ceiling can create natural and flattering illumination.
Adjustable Angle: Many umbrellas offer an adjustable angle, allowing you to control the direction and spread of the light. This flexibility is valuable for adapting to different shooting scenarios.
Diffusers: Softening and Taming Light
Purpose:
Light Softening: Diffusers are designed to soften and scatter light, reducing its intensity and creating a more uniform illumination. They are commonly used with on-camera flashes and external speedlights.
Characteristics:
Translucent Material: Diffusers are constructed from translucent materials that scatter the light emitted by the flash, creating a larger and softer light source.
Portable and Lightweight: Many diffusers are compact and lightweight, making them convenient for on-the-go photographers who need to soften the light in various environments.
Usage Tips:
On-Camera Flash: Attach diffusers directly to your on-camera flash to soften the harsh light produced by the small flash unit. This is beneficial for events, portraits, and casual shooting.
Diffusing Harsh Sunlight: Diffusers can be used outdoors to soften and diffuse harsh sunlight when shooting portraits or macro photography. They act as a portable source of gentle illumination.
Triggers and Sync Systems: Unleashing Off-Camera Flash Creativity
In the dynamic world of flash photography, the ability to take your flash off-camera introduces a realm of creative possibilities. To navigate this territory with finesse, understanding wireless triggers and sync systems is paramount. These technologies empower photographers to break free from the constraints of on-camera flash, allowing for strategic positioning, multi-light setups, and nuanced control over the interplay of light and shadow. Let’s embark on a journey to unravel the intricacies of off-camera flash setups, exploring the diverse world of triggers and sync systems.
Wireless Triggers: The Key to Off-Camera Freedom
Purpose:
Remote Flash Activation: Wireless triggers serve as the bridge that liberates your flash from the confines of the camera. They enable you to trigger your off-camera flashes remotely, unleashing creative possibilities in positioning and lighting setups.
Components:
Transmitter: The transmitter is attached to the camera’s hot shoe and communicates with the off-camera flashes. It sends signals to trigger the flashes at the desired moment.
Receiver: The receiver is connected to the flash unit and receives signals from the transmitter, prompting the flash to fire. Some flashes come with built-in receivers, while others require external receivers.
Types of Triggers:
Radio Frequency (RF) Triggers: RF triggers use radio signals to communicate between the transmitter and receivers. They offer a reliable and versatile solution, often with an extended range and the ability to work through obstacles.
Infrared (IR) Triggers: IR triggers use infrared signals for communication. While they can be effective in line-of-sight scenarios, they may have limitations in bright sunlight or when obstructed.
Usage Tips:
Check Compatibility: Ensure that the wireless triggers are compatible with both your camera and flash units. Different brands and models may have specific compatibility requirements.
Consider Range: Evaluate the range of the wireless triggers, especially if you plan to work in large or outdoor spaces. A longer range provides flexibility in your off-camera setups.
Sync Systems: Achieving Perfect Timing
Synchronization with Shutter: Sync systems ensure perfect timing between the flash and the opening of the camera’s shutter. This coordination is crucial for well-exposed images, preventing issues such as overexposed or underexposed areas.
Components:
Sync Cord: A physical cord that connects the flash directly to the camera. While effective, it limits mobility and may pose challenges in certain shooting scenarios.
Hot Shoe Sync: A direct connection between the flash and the camera’s hot shoe. This provides a reliable sync but limits off-camera positioning.
Wireless Sync: Utilizes wireless technology to synchronize the flash with the camera. Wireless sync systems offer flexibility in off-camera setups without the constraints of physical cords.
Types of Sync Systems:
Front Curtain Sync: The flash fires as soon as the shutter opens. This is the standard sync mode for most flash photography.
Rear Curtain Sync: The flash fires just before the shutter closes. This mode is often used to create dynamic effects by capturing motion trails with the flash at the end of a long exposure.
Usage Tips:
Understand Sync Modes: Experiment with both front curtain sync and rear curtain sync to understand their impact on the visual narrative. Rear curtain sync is particularly effective for capturing motion in low-light situations.
Explore High-Speed Sync (HSS): In scenarios where a higher shutter speed is necessary, such as outdoor portraits or action photography, consider using High-Speed Sync (HSS) to synchronize flash at shutter speeds beyond the standard limit.
The synergy between wireless triggers and sync systems opens a gateway to off-camera flash creativity. As you explore the freedom of positioning your flashes strategically, experimenting with multi-light setups, and crafting intricate lighting scenarios, may the understanding of these technologies become second nature. Let the dance between your camera and off-camera flashes be orchestrated with precision, giving life to images that transcend the ordinary. In the symphony of light and technology, wireless triggers and sync systems serve as the conductor’s baton, guiding your creative vision to new heights.
Mastering Flash Exposure
TTL vs. Manual Flash: A Comprehensive Comparison
In the realm of flash photography, the choice between TTL (Through-The-Lens) and manual flash modes is a pivotal decision that profoundly influences the control and consistency of your lighting. Understanding the characteristics, advantages, and ideal scenarios for each mode empowers photographers to make informed choices, adapting to diverse shooting environments and achieving their desired creative outcomes. Let’s delve into a comprehensive comparison of TTL and manual flash, shedding light on when to use each mode.
TTL (Through-The-Lens) Flash Mode
Overview:
Automatic Exposure Control: TTL flash mode leverages the camera’s metering system to automatically determine the appropriate flash output for a well-exposed image. It reads the through-the-lens information to make real-time adjustments based on the scene’s brightness and subject distance.
Advantages:
Quick and Convenient: TTL is a convenient choice for fast-paced shooting scenarios, as it automatically adjusts the flash output in response to changing lighting conditions. This is particularly beneficial in dynamic environments, such as events or documentary photography.
Consistency in Changing Environments: TTL excels in situations where the ambient light varies rapidly, providing a consistent exposure for the subject regardless of changes in lighting.
User-Friendly: Well-suited for beginners or photographers who prefer a more automated approach to flash photography, TTL simplifies the process of achieving proper exposure.
Ideal Scenarios:
Event Photography: TTL is highly effective in event photography where lighting conditions are unpredictable, and quick adjustments are crucial to capturing candid moments.
Run-and-Gun Shooting: Photographers engaged in run-and-gun shooting styles, such as street photography or photojournalism, benefit from TTL’s adaptability to changing environments.
Fast-Paced Environments: When shooting in environments with rapidly changing light, such as weddings or sports events, TTL ensures consistent and well-exposed images without the need for frequent manual adjustments.
Manual Flash Mode
Overview:
User-Controlled Output: In manual flash mode, the photographer manually sets the flash output, providing precise control over the amount of light emitted. The flash fires at the specified power level until manually adjusted.
Advantages:
Predictable and Consistent: Manual flash mode offers predictability and consistency in lighting, making it ideal for controlled environments where the photographer wants to maintain the same lighting setup throughout the session.
Creative Control: Manual mode provides creative freedom for photographers to experiment with different lighting ratios, achieve specific moods, and craft customized lighting setups.
Strobist Photography: Photographers practicing strobist techniques, such as off-camera flash setups, often prefer manual mode for its precision in controlling the flash output.
Ideal Scenarios:
Studio Photography: Manual flash mode is commonly used in studio settings where the lighting is carefully controlled, and precise adjustments are necessary for achieving the desired look.
Portrait Photography: Portrait photographers often choose manual mode when working with consistent lighting setups, allowing for fine-tuning and creating specific lighting ratios for highlighting different facial features.
Creative Lighting Setups: When crafting intricate lighting setups, such as high-key or low-key portraits, photographers benefit from the precision and control offered by manual flash mode.
When to Use Each Mode:
Use TTL When:
Shooting in Unpredictable Environments: In situations where lighting conditions are changing rapidly, and quick adjustments are needed.
Event Photography: For capturing candid moments in events where the photographer needs to adapt to various lighting scenarios.
Beginners or Casual Shooters: TTL is user-friendly and convenient, making it suitable for those who are just starting or prefer a more automated approach.
Use Manual Mode When:
Working in Controlled Environments: In studio settings or scenarios where the photographer has control over the lighting and wants to maintain consistency.
Creative Lighting Setups: When precision and control are paramount for achieving specific creative effects or lighting ratios.
Practicing Strobist Techniques: For photographers exploring off-camera flash setups and strobist techniques, manual mode provides the necessary control for experimentation.
Choosing between TTL and manual flash modes is not a one-size-fits-all decision; rather, it depends on the specific requirements of each shooting scenario and the photographer’s creative intent. While TTL offers convenience and adaptability in unpredictable environments, manual mode provides the precision and control necessary for crafting customized lighting setups. As you navigate the diverse landscapes of flash photography, may your choice between TTL and manual mode be guided by a deep understanding of their strengths, enabling you to capture images that resonate with your artistic vision. Embrace the flexibility of both modes, and let them become tools in your creative arsenal, each serving a purpose in the pursuit of visually compelling photographs.
Flash Exposure Compensation: Mastering Techniques for Precision
In the intricate dance of flash photography, achieving the perfect exposure requires a nuanced understanding of flash exposure compensation (FEC). This essential technique empowers photographers to finely adjust the flash output, ensuring that the subject is bathed in the ideal amount of light. Let’s delve into the art of flash exposure compensation, exploring techniques to harness its power and achieve precision in your images.
Understanding Flash Exposure Compensation (FEC)
Definition:
FEC in a Nutshell: Flash Exposure Compensation is a tool that allows photographers to manually adjust the power output of their flash, ensuring accurate exposure in varying lighting conditions.
Balancing Act: FEC serves as a balancing act between ambient light and the flash. It enables you to control the intensity of the flash to complement or override the existing light, achieving the desired exposure for your subject.
Techniques for Effective Flash Exposure Compensation
Evaluating Ambient Light:
Assess the Scene: Before adjusting FEC, evaluate the ambient light conditions. Understand the existing lighting and consider how you want the flash to interact with it.
Balancing Act: FEC is often used to balance the flash output with the ambient light, ensuring that the subject is well-lit without overpowering or underexposing the background.
Using Positive FEC:
Boosting Flash Output: Positive FEC values are used when you need to increase the power of the flash. This is beneficial in situations where the ambient light is low, and you want to highlight the subject more prominently.
Portrait Photography: In portrait photography, using positive FEC can help in achieving a well-exposed subject against a darker or more complex background.
Applying Negative FEC:
Diminishing Flash Output: Negative FEC values are employed when you need to decrease the power of the flash. This is useful in scenarios where the ambient light is sufficient, and you want to avoid overexposing the subject.
Fill Flash in Daylight: When shooting in bright daylight, negative FEC can be employed for fill flash, providing subtle illumination without creating harsh shadows.
Bracketing FEC:
Fine-Tuning Exposure: Bracketing FEC involves taking a series of shots with different FEC values to assess the impact on exposure. This technique helps you pinpoint the ideal FEC setting for a specific lighting situation.
Analyzing Results: Review the images and evaluate how different FEC values affect the overall exposure. This process aids in developing an intuitive sense of when to apply positive or negative FEC in various scenarios.
Using FEC with TTL Flash:
TTL and FEC: When using TTL flash mode, FEC adjusts the output based on the camera’s metering system. Positive FEC increases the flash output determined by the camera, while negative FEC decreases it.
Fine-Tuning TTL: FEC is particularly useful in fine-tuning TTL exposure, allowing you to exert creative control over the balance between ambient and artificial light.
Practical Considerations and Tips
Monitor Histograms:
Check Histograms: Keep an eye on the histogram of your images when adjusting FEC. This visual tool provides insights into the distribution of tones and helps you avoid overexposure or underexposure.
Understand Your Flash’s Limits:
Know Your Gear: Different flash units may have varying power ranges and limitations. Understand the capabilities of your specific flash to make informed decisions when applying FEC.
Experiment and Learn:
Practice: Experiment with FEC in various lighting scenarios. Practice helps you develop an intuitive understanding of how different FEC values impact the final image.
Observe Results: Take the time to observe the results of your FEC adjustments and analyze how they contribute to achieving the desired exposure and mood in your photographs.
Flash Exposure Compensation is a potent tool in the arsenal of a flash photographer, offering the finesse to balance ambient light and flash output with precision. As you navigate the complexities of exposure in different lighting conditions, let FEC be your guiding hand, allowing you to sculpt light and shadow with artistic intent. Embrace the art of adjustment, and may your mastery of Flash Exposure Compensation become a hallmark of your ability to capture moments with clarity and impact.
Balancing Ambient and Flash: Crafting Harmonious Illumination
In the realm of flash photography, achieving a seamless and harmonious balance between ambient light and flash is a key to creating natural-looking and visually compelling images. This delicate dance between artificial and natural light requires a thoughtful approach and an understanding of the interplay between these two elements. Let’s explore tips and techniques for achieving a harmonious equilibrium, ensuring that your photographs exude a natural and well-balanced luminosity.
Evaluate Ambient Light Conditions
Observe Lighting Quality:
Direction and Quality: Assess the direction and quality of ambient light. Understanding the existing lighting conditions provides a foundation for determining how the flash will complement or enhance the scene.
Harsh or Soft Light: Consider whether the ambient light is harsh and direct or soft and diffused. This assessment guides decisions on the flash output and the use of light modifiers.
Determine Ambient Exposure:
Expose for Ambient Light: Set your camera settings to expose for the ambient light. This establishes a baseline for the scene’s natural illumination before introducing artificial light.
Use of Histogram: Check the histogram to ensure that the ambient exposure captures a full range of tones, avoiding underexposure or overexposure.
Employ Flash as Fill Light
Fill Flash Technique:
Enhance Shadows: Use the flash as a fill light to illuminate shadows created by ambient light. This technique is effective in reducing contrast and producing well-balanced images.
Maintain Detail: Fill flash helps maintain detail in shadow areas, preventing them from becoming too dark or losing important information.
Adjust Flash Power:
Match Intensity: Adjust the flash power to match the intensity of the ambient light. The goal is to enhance the existing light rather than overpowering it with artificial illumination.
Trial and Error: Experiment with different flash power settings to find the right balance. Take test shots and make adjustments based on the results.
Consider the Color Temperature
White Balance Settings:
Match Color Temperatures: Ensure that the color temperature of the flash matches the ambient light for consistent and natural-looking results.
White Balance Presets: Use white balance presets or manual white balance settings to align the color temperatures of both ambient and flash light sources.
Use Light Modifiers Wisely
Soften Harsh Shadows:
Softboxes and Umbrellas: If working in harsh ambient light, use softboxes or umbrellas to diffuse the flash and create softer shadows. This technique contributes to a more natural and flattering look.
Modify Light Direction: Experiment with the angle and direction of the flash to sculpt the light and achieve a natural-looking three-dimensional effect.
Control Flash Output with FEC
Fine-Tune with Flash Exposure Compensation (FEC):
Balance Intensity: Use FEC to fine-tune the flash output and balance its intensity with the ambient light. Adjusting FEC helps avoid scenes that look overly flashed or unnaturally illuminated.
Bracketing: Consider bracketing FEC values to capture a series of shots with different flash intensities. This technique aids in finding the optimal balance for a specific environment.
Integrate Flash Gradually
Gradual Introduction of Flash:
Subtle Illumination: Gradually introduce the flash to the scene, starting with subtle illumination. This approach allows for incremental adjustments and helps maintain a natural appearance.
Avoid Overloading Light: Be mindful of not overwhelming the scene with flash. Aim for a subtle enhancement that complements the ambient light without dominating the overall lighting scheme.
Practice and Experiment
Experiment with Different Scenarios:
Varied Environments: Practice balancing ambient and flash in various environments, from outdoor settings to indoor spaces with different types of ambient light.
Learn from Results: Analyze the results of your experiments to understand how the interplay of ambient and flash contributes to the overall mood and visual impact of your images.
Achieving a harmonious balance between ambient light and flash is an art that requires a keen eye, technical skill, and a thoughtful approach. By evaluating ambient light conditions, employing flash as a fill light, considering color temperatures, using light modifiers wisely, and fine-tuning with FEC, you can craft images that appear natural and visually pleasing. As you master the art of balancing these two light sources, may your photographs convey a sense of authenticity, capturing moments with a perfect blend of natural and artificial illumination. Embrace the subtlety of harmonious lighting, and let your images speak with a voice that resonates with both precision and artistry.
Lighting Setups for Different Scenarios
Portraiture: Mastering Flattering and Creative Lighting Setups
Portraiture is a captivating genre where lighting plays a pivotal role in shaping the mood, emphasizing features, and conveying the subject’s personality. In this section, we’ll delve into techniques for crafting flattering and creative lighting setups in portrait photography, exploring a variety of approaches to enhance the visual impact of your portraits.
Classic Rembrandt Lighting
Key Characteristics:
Triangle of Light: Rembrandt lighting is characterized by a small, triangular highlight on the cheek opposite the key light, forming a subtle triangle of light on the shadowed side of the face.
Soft and Directional: Achieved by positioning the key light at a 45-degree angle to the subject and slightly above eye level, creating soft yet directional illumination.
Implementation:
Positioning the Light: Place the key light at a 45-degree angle to one side of the subject, slightly above eye level.
Modify with Diffusion: Soften the light using modifiers like a softbox or umbrella to maintain a flattering and gentle quality.
High-Key Portraits
Key Characteristics:
Bright and Airy: High-key lighting involves creating images with predominantly bright tones, often with a white or light-colored background.
Reduced Shadow Contrast: Shadows are minimized, resulting in a soft and even lighting distribution across the subject’s face.
Implementation:
Background Choice: Opt for a white or light-colored background to create a seamless, high-key look.
Use Soft Lighting: Employ soft and diffused lighting, such as a large softbox, to achieve an even illumination on the subject’s face.
Low-Key Dramatic Portraits
Key Characteristics:
Rich Shadows: Low-key lighting emphasizes contrast, creating deep shadows and dramatic highlights.
Mood and Intensity: Ideal for conveying a sense of mystery, moodiness, or intensity in the portrait.
Implementation:
Directional Lighting: Position the key light at a more acute angle to the subject to enhance shadows and sculpt facial features.
Controlled Background: Choose a dark or black background to further emphasize the subject and reduce distractions.
Split Lighting
Key Characteristics:
Equal Division: Split lighting divides the face into two equal halves, with one side in shadow and the other illuminated.
Bold and Striking: This technique creates a bold and striking visual effect, particularly effective for adding a touch of mystery or emphasizing facial symmetry.
Implementation:
Positioning the Light: Place the key light directly to one side of the subject, casting half of the face in shadow.
Adjust for Intensity: Experiment with the angle and intensity of the light to control the balance between the lit and shadowed sides.
Remotely Triggered Fill Light
Key Characteristics:
Subtle Fill: Use a remotely triggered fill light to gently fill in shadows without overpowering the main light source.
Maintaining Detail: Ensures that details in shadowed areas, such as clothing or hair, are preserved.
Implementation:
Separate Light Source: Introduce a fill light, triggered remotely, to provide additional illumination to shadowed areas.
Modify for Softness: Use modifiers like a reflector or a diffuser in front of the fill light to soften its effect for a natural look.
Outdoor Golden Hour Portraits
Key Characteristics:
Warm and Golden Tones: Utilize the warm, soft light during the golden hour—shortly after sunrise or before sunset—for a flattering and ethereal ambiance.
Directional Natural Light: Leverage the directional quality of sunlight during these hours for a natural and appealing look.
Implementation:
Timing is Crucial: Schedule portrait sessions during the golden hour to take advantage of the warm, low-angle sunlight.
Positioning the Subject: Ensure that the subject is facing or positioned with the golden hour light providing a soft and flattering illumination.
Candid and Environmental Portraits
Key Characteristics:
Context and Story: Capture environmental portraits by incorporating the subject’s surroundings, adding context and storytelling elements to the image.
Available Light: Utilize available light sources, such as window light or ambient outdoor light, to maintain a natural and candid feel.
Implementation:
Blend with Environment: Position the subject within the environment and use available light sources for illumination.
Use Wide Aperture: Employ a wide aperture to isolate the subject while allowing the background to add depth and context to the portrait.
Experimentation and Personal Style
Key Characteristics:
Expressive Creativity: Embrace experimentation and the development of a personal style that reflects your creative vision.
Continuous Learning: Continuously explore new lighting techniques, modify existing setups, and adapt your approach to suit different subjects and scenarios.
Implementation:
Try Unconventional Lighting: Experiment with unconventional light sources, reflections, or colored gels to infuse your portraits with a unique and personal touch.
Adapt to Subjects: Tailor your lighting setups to complement the unique features and personality of each subject, allowing your creativity to flourish.
Flattering and creative lighting setups are essential tools in the portrait photographer’s repertoire, enabling the capture of images that resonate with emotion, personality, and visual impact. Whether employing classic techniques like Rembrandt lighting or venturing into experimental styles, the key lies in understanding the characteristics of light and using it to enhance the narrative within each portrait. As you embark on your journey in portrait photography, may these techniques serve as both a foundation and an inspiration, empowering you to create portraits that tell stories, evoke emotions,
Product Photography: Illuminating Products with Precision and Style
Product photography is a specialized field where lighting plays a critical role in showcasing the details, textures, and features of the subject. In this section, we’ll explore techniques for illuminating products with precision and style, ensuring that your product images are visually compelling and effectively communicate the essence of the items you’re photographing.
Utilize Diffused Lighting for Even Illumination
Importance of Even Illumination:
Minimize Shadows: Diffused lighting helps minimize harsh shadows, providing even illumination across the product. This is essential for revealing details and textures without distracting shadows.
Highlighting Surfaces: Even lighting is particularly important for products with reflective surfaces, ensuring that highlights are controlled and surfaces appear smooth.
Implementation:
Softboxes and Diffusers: Use softboxes, diffusers, or light tents to create soft and diffused lighting. These tools help spread the light evenly and reduce harsh shadows.
Positioning Light Sources: Position light sources at angles that avoid direct reflections and hotspots on the product. Experiment with the distance and angles to achieve optimal diffusion.
Showcase Texture with Directional Lighting
Enhancing Texture and Form:
Directional Shadows: Introduce directional lighting to create subtle shadows that emphasize the product’s texture, form, and three-dimensional qualities.
Sculpting with Light: Directional lighting allows you to sculpt the product, enhancing its contours and creating a sense of depth.
Implementation:
Single-Source Directional Light: Position a single light source, such as a strobe or a continuous light, to cast directional light on the product. Adjust the angle to control the direction of the shadows.
Use of Reflectors: Place reflectors strategically to bounce light onto shadowed areas, filling in shadows while maintaining a sense of directionality.
Achieve Clean Highlights for Reflective Surfaces
Managing Reflections:
Control Reflections: For products with reflective surfaces, careful control of highlights is crucial to avoid distracting reflections and ensure a clean and polished appearance.
Highlight Placement: Place highlights intentionally on non-distracting areas of the product to enhance its features without introducing unwanted reflections.
Implementation:
Flagging and Flagged Light Sources: Use flags or gobos to block or control reflections on reflective surfaces. This technique helps you manage highlights and achieve a controlled look.
Polished and Matte Surfaces: Adjust the lighting setup based on the product’s surface. Highlight reflections on polished surfaces and minimize reflections on matte surfaces.
Background Lighting for Separation
Importance of Background Separation:
Creating Depth: Use background lighting to separate the product from its background, creating a sense of depth and preventing the subject from blending into the backdrop.
Highlighting Edges: Background lighting highlights the edges of the product, making it stand out and enhancing its overall visual appeal.
Implementation:
Backlighting Techniques: Employ backlighting techniques, such as placing a light behind or to the sides of the product, to illuminate the background selectively.
Adjusting Intensity: Adjust the intensity of the background light to achieve the desired level of separation. Experiment with different lighting ratios to find the optimal balance.
Incorporate Colored Gels for a Creative Touch
Adding a Colorful Dimension:
Creative Expression: Incorporate colored gels on lights to introduce a creative and stylized element to your product photography. Colored lighting can evoke a mood or enhance the product’s visual appeal.
Highlighting Features: Use colored gels to highlight specific features of the product or to create a visually interesting atmosphere.
Implementation:
Gel Placement: Attach colored gels to your lights and experiment with different gel colors. Place the gelled lights strategically to add color accents or create a unique atmosphere.
Controlled Application: Use colored gels sparingly and with purpose. Ensure that the colored lighting complements the product and doesn’t overwhelm the overall visual composition.
Control Specular Highlights for Shiny Surfaces
Managing Specular Highlights:
Highlight Control: Shiny surfaces can produce specular highlights that may distract from the product’s details. Controlling and shaping these highlights is essential for a polished look.
Highlight Size and Shape: Adjust lighting angles and diffusion to control the size and shape of specular highlights on shiny surfaces.
Implementation:
Diffusion and Reflection Control: Use diffusers and modifiers to control the reflection and diffusion of light on shiny surfaces. Experiment with different angles and distances to achieve the desired effect.
Highlight Shaping: Employ techniques such as feathering the light or using grids to control the direction and spread of light, helping to shape specular highlights.
Experiment with Multiple Light Sources
Adding Dimension with Multiple Lights:
Dimension and Texture: Incorporate multiple light sources to add dimension and emphasize different textures within the product. This approach is particularly effective for complex or multi-textured products.
Highlighting Details: Each light source can be dedicated to highlighting specific details, contributing to a comprehensive and well-documented representation of the product.
Implementation:
Key, Fill, and Accent Lights: Designate different lights for key, fill, and accent roles. Experiment with the placement and intensity of each light to achieve a balanced and visually appealing result.
Controlling Shadows: Multiple lights allow you to control the shadow areas independently, providing flexibility in highlighting and shaping various parts of the product.
Optimize Lighting for Different Product Types
Tailoring Lighting to Product Characteristics:
Consider Product Material: Adjust your lighting setup based on the material of the product. Different materials, such as glass, metal, or fabric, may require specific lighting considerations.
Size and Shape: Adapt your lighting to the size and shape of the product. Smaller products may benefit from precise, focused lighting, while larger products may require broader illumination.
Implementation:
Test Shots and Adjustments: Take test shots to evaluate how the lighting interacts with the specific characteristics of the product. Make adjustments as needed to achieve optimal results.
Customized Setups: Develop customized lighting setups for different product types or categories. Having versatile lighting techniques allows you to adapt to a variety of products.
Mastering product photography lighting involves a combination of technical expertise, creativity, and adaptability. Whether you’re capturing the intricate details of jewelry, the reflective surfaces of electronic gadgets, or the textures of fabrics, the key is to understand the unique characteristics of each product and tailor your lighting setup accordingly. By utilizing diffused lighting, directional illumination, controlled highlights, background separation, creative gels, specular highlight management, multiple light sources, and product-specific optimizations, you can elevate your product photography to new heights. As you experiment and refine your techniques, may your product images captivate viewers and convey the essence of each item with precision and style.
Event Photography: Navigating Challenging Lighting Situations
Event photography presents a unique set of challenges due to the dynamic nature of gatherings, varying light conditions, and the need to capture candid moments. In this section, we’ll explore techniques for navigating challenging lighting situations at events, ensuring that you can adapt to different environments and deliver compelling images that tell the story of the occasion.
Understand the Venue Lighting
Venue Assessment:
Natural and Artificial Light: Evaluate the combination of natural and artificial light sources in the venue. Understand the color temperatures and intensity of existing lighting.
Ambient Light Levels: Take note of ambient light levels and how they vary across different areas of the venue. This understanding will guide your choice of camera settings and additional lighting.
Implementation:
Scouting the Venue: Arrive early to scout the venue and familiarize yourself with the lighting conditions. Identify key areas where events and important moments are likely to take place.
Adaptability: Equip yourself with a versatile set of camera equipment and lighting tools to adapt to different lighting scenarios.
Master Low-Light Photography Techniques
Importance of Low-Light Mastery:
Common in Events: Many events, especially indoor or evening gatherings, involve low-light conditions. Mastering low-light photography techniques is crucial for capturing clear and well-exposed images.
Reducing Noise: Techniques like using wider apertures, slower shutter speeds, and higher ISO settings help reduce noise in low-light situations.
Implementation:
Wide Aperture Lenses: Invest in lenses with wide apertures (e.g., f/1.4 or f/2.8) to allow more light into the camera sensor. This is particularly beneficial for shooting in low-light conditions.
Stabilization Tools: Use image stabilization (IS) or vibration reduction (VR) features in lenses or camera bodies to compensate for camera shake when shooting at slower shutter speeds.
Leverage Available Light Sources
Natural and Ambient Light:
Utilize Windows and Doors: If shooting indoors, position subjects near windows or doors to leverage natural light. This provides a flattering and soft illumination.
Ambient Light Atmosphere: Capture the ambiance of the event by incorporating existing ambient light sources. This adds a genuine and atmospheric quality to your images.
Implementation:
Position Subjects Strategically: Guide subjects to areas with favorable light, and be mindful of how existing light contributes to the overall atmosphere of the event.
White Balance Adjustments: Make white balance adjustments to ensure accurate color reproduction when working with mixed light sources.
Employ On-Camera Flash Thoughtfully
On-Camera Flash Considerations:
Fill Flash for Shadows: Use on-camera flash as fill light to reduce harsh shadows, especially in outdoor events with strong sunlight casting deep shadows.
Avoid Overpowering Ambient Light: Adjust flash power to avoid overpowering ambient light, maintaining a natural look and preventing the “flashy” appearance.
Implementation:
Bounce Flash Technique: If applicable, bounce the flash off ceilings or walls to create softer and more diffused lighting. This technique minimizes direct harsh light on subjects.
Diffusers and Modifiers: Attach diffusers or modifiers to on-camera flashes to soften the light and achieve a more flattering result.
Off-Camera Flash for Creative Lighting
Creative Lighting Scenarios:
Highlighting Subjects: Use off-camera flash to highlight specific subjects or elements in the frame. This adds creativity and emphasis to key moments.
Creating Depth: Off-camera flash can be strategically placed to create depth in images, separating subjects from the background and adding dimension.
Implementation:
Wireless Flash Systems: Invest in wireless flash systems to have the flexibility to position off-camera flashes in various locations. This enhances creative control over lighting.
Diffusion and Softening: Attach diffusers or softboxes to off-camera flashes for a softer and more natural look, even when using additional lighting.
White Balance Adjustment for Color Consistency
Maintaining Color Consistency:
Mixed Lighting Challenges: Events often feature mixed lighting conditions, such as tungsten or fluorescent lights indoors and natural light outdoors. Adjust white balance to maintain color consistency.
Custom White Balance: Consider creating custom white balance settings based on the predominant lighting conditions in different areas of the venue.
Implementation:
Auto and Manual White Balance: Choose between auto white balance and manual white balance settings based on the lighting scenario. Experiment with different settings to achieve accurate color reproduction.
Color Correction in Post-Processing: If necessary, correct color discrepancies during post-processing to ensure a cohesive and natural color palette in your event photos.
Candid Moment Capture with Fast Autofocus
Importance of Fast Autofocus:
Dynamic Events: Events are dynamic, and capturing candid moments requires quick and accurate autofocus. Fast autofocus performance ensures that you don’t miss spontaneous and fleeting moments.
Continuous Autofocus: Use continuous autofocus modes to track moving subjects, especially in scenarios where subjects are in motion.
Implementation:
High-Performance Lenses: Equip yourself with lenses that offer fast and reliable autofocus performance. Prime lenses with wide apertures are often preferred for their speed and accuracy.
Focus Modes and Points: Familiarize yourself with the autofocus modes and points on your camera. Adjust settings based on the movement of subjects and the composition of the scene.
Capture Genuine Emotions and Reactions
Candid Moment Strategies:
Observational Approach: Blend into the event and adopt an observational approach to capture genuine emotions and reactions. Avoid interrupting the natural flow of the event.
Anticipation and Timing: Anticipate moments of emotion or interaction and be ready to capture them at the right time. Patience and timing are key in event photography.
Implementation:
Continuous Shooting Mode: Use continuous shooting mode to capture a series of images in rapid succession. This increases the likelihood of capturing the perfect moment within a sequence.
Unobtrusive Shooting: Minimize the use of intrusive equipment or actions that may draw attention. This helps subjects remain natural and uninhibited in their expressions.
Event photography demands adaptability, quick decision-making, and technical proficiency to navigate challenging lighting situations successfully. By understanding venue lighting, mastering low-light techniques, leveraging available light sources, using on-camera and off-camera flash thoughtfully, adjusting white balance, ensuring fast autofocus, and capturing genuine emotions, you can create a comprehensive and compelling visual narrative of any event. Embrace the spontaneity of gatherings, and may your event photography reflect the vibrancy, authenticity, and essence of each
Creative Flash Techniques
High-Speed Sync: Capturing the Speed of Light
Understanding High-Speed Sync (HSS)
The Need for Speed:
Explore the limitations of standard flash sync and the scenarios where high-speed sync becomes essential.
Understand how HSS enables flash photography at shutter speeds exceeding the standard sync limit.
Techniques for Implementation:
Step into the world of high-speed photography and learn how to activate and utilize HSS on your flash unit and camera.
Discover the impact of HSS on freezing fast-moving subjects and creating visually stunning images.
Applications of High-Speed Sync
Freezing Action:
Delve into freezing fast-paced action with HSS, capturing crisp details in scenes with rapid movement.
Explore sports photography, wildlife, and dynamic scenarios where HSS elevates your ability to freeze the moment.
Balancing Ambient Light:
Learn how HSS facilitates seamless integration of flash with ambient light, allowing for balanced exposures in challenging lighting conditions.
Explore the creative possibilities of using HSS to control ambient light and enhance the overall visual impact of your images.
Multiple Flash Setups: Crafting Depth and Dimension
The Power of Multiple Flash Units
Beyond Single Flash:
Understand the advantages of using multiple flash units to create depth, dimension, and dynamic lighting effects.
Explore how a combination of key, fill, and accent lights contributes to multi-dimensional and visually compelling images.
Creating Shadows and Highlights:
Dive into the world of light manipulation, where multiple flashes allow you to sculpt shadows and highlights with precision.
Experiment with the positioning and intensity of each flash unit to control the interplay of light and shadow in your compositions.
Techniques for Multiple Flash Setups
Three-Point Lighting:
Uncover the classic three-point lighting setup and its application in portrait photography.
Explore how key, fill, and hair or background lights work together to enhance facial features, add dimension, and separate the subject from the background.
Dramatic Lighting Scenarios:
Push the boundaries of creativity with multiple flashes in dramatic lighting setups.
Learn how to craft striking images with techniques like rim lighting, cross lighting, and accentuating specific elements within a scene.
Light Painting: Illuminating the Canvas of Darkness
The Artistry of Light Painting
Beyond Traditional Lighting:
Embrace the artistic freedom of light painting, moving beyond conventional flash techniques.
Understand how light painting with flash allows you to “paint” with light, adding a surreal and imaginative touch to your photographs.
Tools and Techniques:
Explore a range of tools, including flashlights, colored gels, and long-exposure settings, to create mesmerizing light-painted images.
Experiment with different techniques, such as light trails, orbs, and intricate patterns, to add a unique and captivating dimension to your photography.
Applications of Light Painting with Flash
Creating Visual Impact:
Harness the power of light painting to create images with visual impact, drawing attention to specific elements within a scene.
Explore how light painting can be applied in various genres, from portraits to landscapes, to evoke emotion and capture the viewer’s imagination.
Expressing Creativity:
Unleash your creativity by using light painting as a form of self-expression.
Develop your personal style and experiment with different light painting techniques to infuse a sense of wonder, drama, or fantasy into your photographic work.
As we conclude the exploration of creative flash techniques, you’ve embarked on a journey that goes beyond the basics. High-speed sync has opened the door to freezing action and mastering challenging lighting conditions. Multiple flash setups have provided you with the tools to sculpt light in three dimensions, adding depth to your compositions. Light painting with flash has allowed you to become an artist, painting with light and expressing your creativity in new and captivating ways. Armed with these advanced techniques, you’re now equipped to push the boundaries of what’s possible with flash photography, unlocking a realm of creative possibilities that will define your unique style as a photographer.
Troubleshooting and Common Mistakes
Overcoming Common Issues: Navigating Flash Photography Challenges
Understanding Common Challenges
Overview of Common Issues:
Identify and understand common challenges faced by flash photographers, from exposure problems to color inconsistencies.
Recognize the impact of environmental factors and technical limitations on the outcome of your flash photography.
Troubleshooting Mindset:
Develop a troubleshooting mindset to efficiently diagnose and address issues as they arise during a photo shoot.
Learn to assess the root causes of problems and implement effective solutions on the fly to ensure a smooth shooting experience.
Addressing Exposure Challenges
Overexposure and Underexposure:
Explore techniques to address overexposure and underexposure issues that may arise when working with flash.
Understand the relationship between flash power, aperture, and ISO settings to achieve balanced and well-exposed images.
Balancing Flash and Ambient Light:
Master the art of balancing flash and ambient light to prevent harsh shadows or blown-out highlights.
Learn how to adjust flash power and camera settings to seamlessly integrate artificial and natural light sources.
Avoiding Harsh Shadows and Highlights: Crafting Soft and Flattering Lighting
The Pitfalls of Harsh Lighting: Navigating Challenges for Flattering Portraits
Harsh Shadows and Highlights Defined: Understanding the Downsides of Intense Lighting
Deep Shadows:
Recognize the presence of deep, unflattering shadows that harsh lighting can cast on your subjects’ faces and surroundings.
Understand how harsh shadows can obscure facial features, create distracting patterns, and lead to an overall loss of detail.
Overly Bright Highlights:
Explore the challenges posed by overly bright highlights, which can result in blown-out areas and loss of detail in critical parts of the image.
Identify scenarios where intense highlights can distract from the subject and diminish the overall visual appeal of the photograph.
The Unflattering Effects: How Harsh Lighting Impacts Portraits
Accentuating Imperfections:
Understand how harsh lighting can accentuate imperfections, such as skin blemishes, wrinkles, and uneven textures, leading to less flattering portrayals.
Explore techniques to mitigate these effects and create a more even and pleasing complexion for your subjects.
Flattening Features:
Recognize the tendency of harsh lighting to flatten facial features, resulting in a lack of dimension and depth in your portraits.
Learn to use lighting techniques that enhance contours and create a more sculpted and visually engaging appearance.
The Role of Environment and Light Sources: Identifying Contributing Factors
Unmodified Light Sources:
Understand how unmodified light sources, such as direct sunlight or on-camera flash without diffusers, contribute to the creation of harsh lighting.
Explore the characteristics of these light sources and their impact on the overall quality of illumination.
Time of Day Considerations:
Consider the influence of the time of day on the intensity and direction of natural light, with particular attention to midday sun and its potential for harsh shadows.
Develop strategies for planning outdoor shoots to minimize the pitfalls of harsh lighting based on the sun’s position in the sky.
Harsh Shadows and Highlights Defined:
Understand the characteristics of harsh lighting, including deep shadows and overly bright highlights, and their impact on image quality.
Recognize scenarios where harsh lighting is likely to occur, such as direct on-camera flash or strong, unmodified light sources.
The Unflattering Effects:
Explore how harsh lighting can accentuate imperfections, flatten features, and diminish the overall visual appeal of your subjects.
Develop an awareness of the importance of soft and diffused lighting in creating flattering portraits.
Techniques for Achieving Soft and Flattering Lighting
Softening On-Camera Flash:
Implement techniques to soften on-camera flash, including the use of diffusers, bounce flash, and modifiers.
Discover how modifying on-camera flash can transform harsh light into a softer, more pleasing illumination.
Off-Camera Flash Strategies:
Embrace the versatility of off-camera flash to create soft and flattering lighting setups.
Explore the use of softboxes, umbrellas, and other light modifiers to achieve a gentle and even illumination that enhances your subjects.
Natural Light Considerations: Harnessing the Beauty of Ambient Illumination
Utilizing Natural Light: Embracing the Essence of Ambient Illumination
The Inherent Beauty of Natural Light:
Recognize the unique qualities of natural light and its ability to create a soft, flattering illumination that enhances the natural features of your subjects.
Understand the role of sunlight, diffused skylight, and other natural light sources in shaping the mood and atmosphere of your photographs.
Direction and Quality of Natural Light:
Explore how the direction of natural light influences the appearance of your subjects, creating subtle highlights and shadows that add depth and dimension.
Learn to identify and leverage the different qualities of natural light, from the softness of an overcast day to the warmth of the golden hour.
Golden Hour Magic: Embracing the Warmth and Radiance of Sunset
The Golden Hour Defined:
Delve into the concept of the golden hour, a magical period shortly after sunrise or before sunset when the sun’s angle bathes the scene in warm, golden tones.
Understand how the golden hour provides a naturally soft and diffused light that is particularly flattering for portraits.
Planning and Scheduling:
Develop strategies for planning and scheduling photo sessions during the golden hour to take advantage of its enchanting qualities.
Consider the seasonal variations in the timing and duration of the golden hour, adjusting your plans accordingly.
Positioning Subjects for Natural Light Portraits
Facing the Light:
Guide your subjects to face the primary source of natural light, whether it’s the sun, skylight, or another ambient light source.
Understand how frontal lighting creates even illumination, reducing harsh shadows and revealing natural skin tones.
Experimenting with Angles:
Experiment with different angles in relation to the light source to achieve varied effects in your portraits.
Explore side lighting for a more dramatic look, backlighting for a halo effect, and other angles that enhance the mood and storytelling elements of your images.
Modifying Natural Light: Enhancing Control and Creativity
Reflectors and Bounce Cards:
Integrate reflectors and bounce cards into your natural light photography toolkit to redirect and amplify ambient light.
Understand how reflectors can fill in shadows, highlight specific areas, and add a subtle sparkle to your subjects’ eyes.
Diffusing Harsh Sunlight:
Mitigate the effects of harsh sunlight by using diffusers or natural elements like tree canopies or sheer fabrics.
Learn to diffuse and soften direct sunlight, reducing contrast and creating a more flattering and even illumination.
Leverage the beauty of natural light to avoid harsh shadows and highlights.
Learn to position your subjects in relation to natural light sources for soft, flattering illumination in outdoor and indoor environments.
Golden Hour Magic:
Embrace the golden hour as a natural soft light source, creating a warm and ethereal atmosphere for your portraits.
Plan and schedule photo sessions during the golden hour to take advantage of the naturally flattering qualities of this magical time.
In this chapter, you’ve explored the art of troubleshooting and addressing common mistakes in flash photography. By understanding and overcoming exposure challenges, you’re equipped to achieve well-balanced images in various lighting conditions. Additionally, you’ve learned techniques to avoid harsh shadows and highlights, ensuring your portraits are soft, flattering, and visually appealing. As you apply these troubleshooting tips and lighting techniques, you’ll enhance your skills as a photographer and consistently produce high-quality images that captivate and engage your audience.
Congratulations, Flashographer! You’ve reached the end of “The Flashographer’s Handbook.” Armed with the knowledge and techniques within these pages, you’re now equipped to harness the power of artificial lighting and elevate your photography to new heights. Go forth, experiment, and illuminate the world with your masterful shots!