


Mastering Water Photography
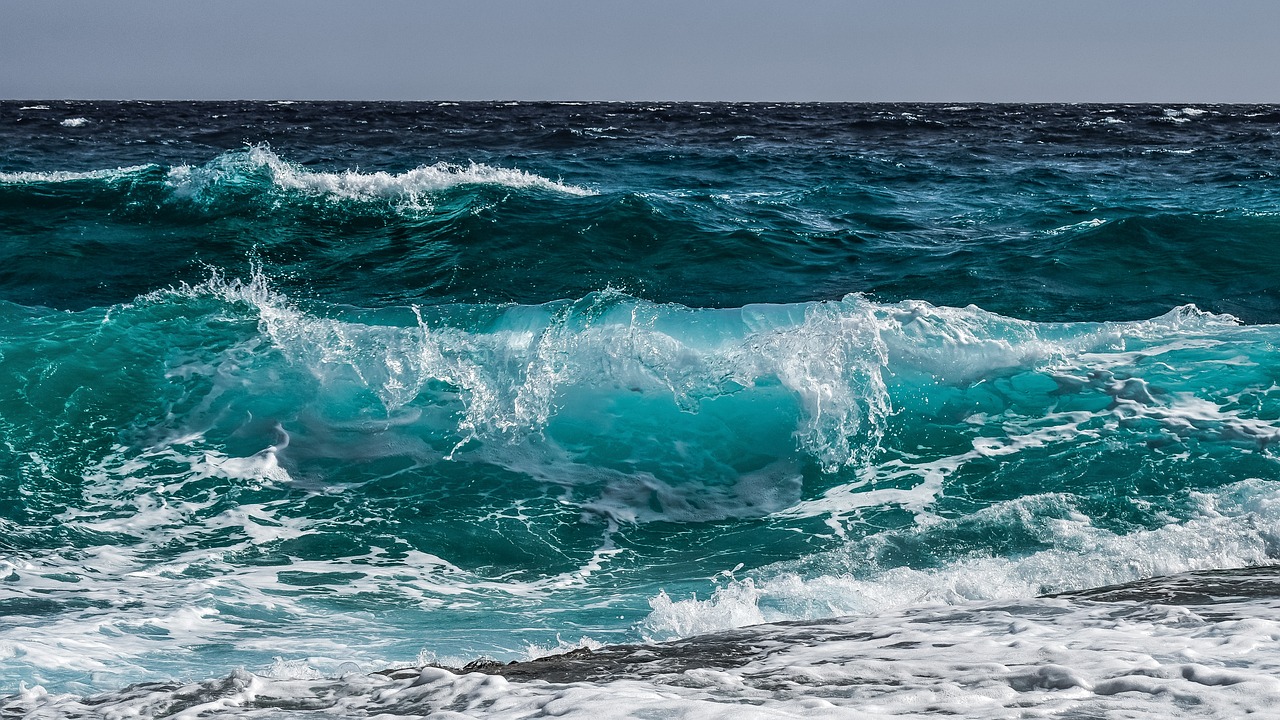
Water is a dynamic force that has the power to mesmerize, captivate, and evoke a range of emotions. In the world of photography, the art of capturing water in its myriad forms is a captivating endeavor that requires a unique set of skills, techniques, and a keen understanding of the ever-changing nature of this liquid element.
Understanding the Essence of Water Photography:
At its core, water photography goes beyond the mere representation of a liquid substance. It involves an intimate exploration of the essence of water—its fluidity, reflections, and ability to shape the landscapes it touches. In this introductory chapter, we delve into the philosophical and artistic aspects of water photography. What draws us to the glistening surface of a tranquil lake or the powerful cascade of a waterfall? How can we translate the intangible beauty of water into visual poetry through our lens? These are the questions that will guide our journey as we seek to master the art of capturing water in all its forms.
The Appeal of Capturing Water in Various Forms:
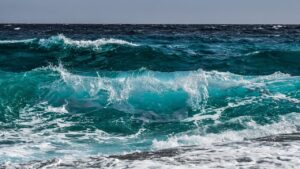
From serene seascapes to the thundering force of a river, water manifests itself in a multitude of captivating forms. Each presents a unique challenge and an opportunity for creativity. We explore the diverse environments where water takes center stage—whether it’s the rhythmic lapping of waves on a sandy shore or the ethereal mist rising from a mountain stream. Understanding the nuances of these settings allows us to not only document but to truly connect with the essence of water and convey its emotional impact through our photographs.
As we embark on this exploration of mastering water photography, let us embrace the fluidity of our subject and the endless possibilities it brings to our creative endeavors. Join us on a journey where we learn to see beyond the surface, capturing the essence of water in its ever-changing and eternal beauty.
The realm of water photography is as diverse as the bodies of water it seeks to capture. To embark on this photographic journey, one must be well-prepared with the right gear and an understanding of the unique camera settings required to navigate the challenges presented by various water environments.
Essential Gear for Water Photography:
Waterproof Camera Bag:
Protecting your equipment is paramount when working in and around water. Invest in a high-quality, waterproof camera bag to safeguard your camera, lenses, and accessories from splashes and unexpected downpours.
Sturdy Tripod:
Stability is key, especially when shooting in low light conditions or using slower shutter speeds. A durable, water-resistant tripod will ensure sharp and crisp images, even in challenging environments.
In the realm of water photography, a polarizing filter stands out as an invaluable tool, enhancing colors and reducing glare to elevate the quality of your images. This essential accessory empowers you to control reflections on water surfaces, capturing vibrant, detail-rich compositions that draw viewers into the captivating world of aquatic landscapes.
Key Benefits of a Polarizing Filter in Water Photography:
Color Enhancement:
A polarizing filter significantly enhances colors, particularly in environments where water is a dominant element. The filter helps reduce atmospheric haze and reflections, allowing the true vibrancy of the scene to shine through. Blues become richer, greens more saturated, and the overall color palette becomes more vibrant.
Glare Reduction:
Glare from the sun or artificial light sources on water surfaces can be a common challenge in water photography. A polarizing filter is exceptionally effective in reducing this glare, enabling you to capture clearer and more detailed images. This reduction in glare is particularly beneficial when photographing lakes, rivers, or coastal scenes.
Reflection Control:
Controlling reflections is crucial for achieving visually compelling water photographs. The polarizing filter allows you to manage and even eliminate unwanted reflections on water, revealing the details beneath the surface. This is especially advantageous when photographing subjects like rocks, pebbles, or aquatic life beneath the water’s surface.
Sky Enhancement:
Beyond its impact on water, a polarizing filter enhances the appearance of the sky. By reducing atmospheric haze and increasing the contrast between clouds and the blue sky, the filter creates a more dynamic and visually appealing backdrop for your water compositions.
Practical Tips for Using a Polarizing Filter:
Adjust the Polarizer for Desired Effect:
Rotate the polarizing filter to achieve the desired effect. The impact of the filter varies based on the angle of the sun and your shooting direction. Experiment with different rotations to find the optimal position for minimizing glare and enhancing colors.
Be Mindful of Artifacts:
While a polarizing filter is a powerful tool, be mindful of potential artifacts, such as uneven polarization or darkened areas in the sky. Adjust the filter carefully to avoid unintended effects, especially when photographing scenes with a wide range of colors and reflections.
Combine with Other Filters:
Experiment with combining a polarizing filter with other filters, such as neutral density filters, to achieve unique effects. This combination can be particularly effective when capturing long exposures of water scenes, allowing you to control reflections while maintaining the desired shutter speed.
Choose High-Quality Filters:
Invest in high-quality polarizing filters to ensure optimal performance and minimal impact on image sharpness. Coated filters with anti-reflective coatings help reduce flare and maintain image clarity.
Lens Cleaning Kit:
Water droplets and mist can quickly accumulate on your lens, affecting image quality. Keep a lens cleaning kit handy to maintain clear and pristine optics throughout your water photography sessions.
Neutral Density (ND) Filters: Mastering Light in Water Photography
In the intricate dance of light and water, Neutral Density (ND) filters emerge as indispensable tools for photographers seeking to control exposure and craft stunning long exposure effects. Particularly beneficial when capturing the dynamic movement of waterfalls or rivers, ND filters enable precise management of light in diverse water environments, elevating the visual impact of your images.
Key Functions of Neutral Density (ND) Filters in Water Photography:
Exposure Control:
ND filters are designed to reduce the amount of light entering the camera without affecting color balance. This enables you to control exposure in situations where the ambient light is too bright, such as during midday or in well-lit water environments. By extending exposure times, ND filters open up creative possibilities for capturing intricate details and achieving balanced exposures.
Long Exposure Effects:
One of the primary applications of ND filters in water photography is the creation of long exposure effects. By allowing you to use slower shutter speeds, ND filters transform the appearance of moving water. The result is a smooth, silky effect that emphasizes the flow and movement, whether it’s a cascading waterfall, a meandering river, or the gentle lapping of waves on a shore.
Highlight Control:
When dealing with scenes that have both bright highlights and deep shadows, such as a sunlit waterfall surrounded by shaded rocks, ND filters contribute to balancing the overall exposure. This control over highlights is especially crucial for preserving details in areas that may otherwise be overexposed.
Achieving Creative Blur:
ND filters enable the creation of creative blur effects in water photography. Whether it’s capturing the swirling patterns of eddies in a stream or the misty appearance of crashing waves, the ability to extend exposure times adds a layer of artistic expression to your water compositions.
Practical Tips for Using Neutral Density (ND) Filters:
Selecting the Right ND Filter Strength:
ND filters come in various strengths, measured in stops. Choose the appropriate filter strength based on the amount of light you want to reduce and the desired effect. For long exposure photography in bright conditions, stronger ND filters (e.g., 6-stop or 10-stop) are often preferred.
Combining ND Filters with Other Filters:
Experiment with combining ND filters with other filters, such as polarizing filters or graduated ND filters, to achieve specific creative effects. This can be particularly effective when photographing water scenes with a mix of bright and dark areas.
Stabilize Your Camera:
When using ND filters for long exposure photography, it’s essential to stabilize your camera to prevent blur from camera shake. Use a sturdy tripod, and consider using a remote shutter release or the camera’s built-in timer to minimize vibrations when capturing long exposures.
Explore Different Shutter Speeds:
Experiment with a range of shutter speeds to find the optimal exposure for your desired effect. Longer exposures, facilitated by ND filters, can create a dreamy, ethereal quality in water photographs, while shorter exposures may be suitable for capturing more defined details.
Lens Hood:
Shield your lens from water droplets and stray light with a lens hood. This simple accessory can make a significant difference in the clarity and contrast of your water photographs.
Weather-Sealed Camera Body: Protecting Your Gear in Unpredictable Conditions
In the dynamic world of water photography, where the elements are ever-changing, investing in a camera body with weather-sealing is a strategic choice that can safeguard your equipment against the challenges posed by moisture and adverse weather conditions. This feature becomes particularly crucial when shooting near water, where mist, rain, or unexpected splashes can pose a threat to the well-being of your camera.
Key Advantages of a Weather-Sealed Camera Body in Water Photography:
Moisture Resistance:
Weather-sealed camera bodies are designed to resist moisture and provide an extra layer of protection against water infiltration. This feature is especially valuable when shooting in environments where water exposure is likely, such as near rivers, lakes, or coastal areas.
Dust and Debris Protection:
Beyond moisture resistance, weather-sealed cameras offer protection against dust and debris. This is particularly beneficial when shooting in windy or sandy conditions near bodies of water, where airborne particles can pose a risk to the delicate components of your camera.
Durability in Harsh Conditions:
The robust construction of weather-sealed camera bodies enhances their overall durability. This is advantageous when facing the challenges of shooting in harsh weather conditions, such as rainstorms or misty coastal environments. A weather-sealed camera can withstand these conditions, allowing you to focus on capturing compelling images without concerns about your gear’s integrity.
Extended Shooting Opportunities:
Owning a weather-sealed camera body expands your flexibility and allows you to seize photographic opportunities in various weather conditions. Whether it’s capturing the drama of a stormy seascape or the tranquility of a misty morning by a lake, you can confidently explore diverse water environments without compromising the safety of your equipment.
Practical Considerations When Using a Weather-Sealed Camera:
Compatible Lenses:
Ensure that the lenses you use are also weather-sealed to maintain the overall integrity of your camera system. Weather-sealed lenses, when paired with a weather-sealed camera body, provide comprehensive protection against the elements.
Regular Maintenance:
While weather-sealed cameras are designed to withstand challenging conditions, it’s essential to perform regular maintenance. Clean your camera and lenses after shooting in adverse weather to remove any residual moisture, salt, or debris.
Monitor Seals and Gaskets:
Periodically check the seals and gaskets of your weather-sealed camera for signs of wear or damage. Damaged seals can compromise the effectiveness of weather-sealing, so prompt replacement is recommended if you notice any issues.
Use Additional Protection:
In extremely harsh conditions, consider using additional protective accessories such as rain covers or camera sleeves. While weather-sealing provides a strong defense, these accessories offer an extra layer of security for prolonged exposure to severe weather.
Camera Settings for Different Water Environments:
Shutter Speed for Motion:
Fast shutter speeds (1/500s and above) freeze the motion of crashing waves or fast-flowing rivers.
Slow shutter speeds (1/30s and below) create smooth, ethereal effects in water, especially when photographing waterfalls or gentle streams.
Aperture for Depth:
Use a wide aperture (low f-stop) to achieve a shallow depth of field, isolating a specific water feature while blurring the background.
A smaller aperture (higher f-stop) ensures a greater depth of field, ideal for capturing expansive seascapes or intricate details in a water scene.
ISO for Light Conditions:
In well-lit conditions, keep the ISO low (100-400) to maintain image quality.
In low-light situations, raise the ISO (800 and above) to ensure proper exposure without sacrificing shutter speed.
White Balance for Mood: Setting the Tone in Water Photography
White balance is a powerful tool in water photography, allowing you to influence the mood and atmosphere of your images by adjusting the color temperature. Whether you aim to evoke the warmth of a sunset or the coolness of a misty morning by the water, mastering white balance enhances your creative control and adds a layer of emotional depth to your compositions.
Utilizing White Balance to Convey Mood:
Warm Tones (Kelvin values around 5000K):
Sunset Atmosphere:
Increase the color temperature to introduce warm, golden tones into your water photographs. This is particularly effective during sunset or golden hour, where the low angle of the sun bathes the scene in a warm, inviting glow. Enhancing the warmth can create a romantic, tranquil, or nostalgic mood.
Autumnal Ambiance:
Embrace warm tones to convey the feeling of autumn. The golden hues complement fall foliage and add a cozy, comforting atmosphere to your water scenes. This works well for capturing reflections in lakes or rivers surrounded by autumn colors.
Cool Tones (Kelvin values around 8000K):
Misty Morning by the Water:
Lower the color temperature to introduce cool, blue tones that evoke the serenity of a misty morning by the water. This cooler ambiance is well-suited for capturing ethereal scenes with soft, diffused light. It imparts a sense of calmness, mystery, or solitude to your water compositions.
Icy Landscapes:
Cool tones are ideal for photographing icy landscapes, such as glaciers or frozen bodies of water. Lowering the color temperature enhances the sense of frigidity, emphasizing the crisp textures and creating a visually striking portrayal of winter environments.
Practical Tips for Adjusting White Balance:
Custom White Balance:
Consider using custom white balance settings to precisely match the color temperature to the lighting conditions. This is particularly useful in situations where the automatic white balance may not accurately capture the desired mood.
Post-Processing Adjustments:
Fine-tune white balance during post-processing to achieve the desired mood. Software tools like Lightroom or Photoshop provide flexibility in adjusting color temperature and tint, allowing you to refine the overall tonality of your water photographs.
Consistency in Series:
Maintain consistency in white balance settings when creating a series of water photographs. This ensures a cohesive visual narrative and reinforces the mood you intend to convey throughout the collection.
Experimentation and Creativity:
Embrace experimentation and creative exploration with white balance. Don’t be afraid to push boundaries and try unconventional color temperatures to achieve unique effects that complement the specific mood you envision for your water compositions.
In the realm of water photography, mastering composition is the key to transforming a captivating scene into a powerful visual narrative. Understanding and applying composition techniques will elevate your water photographs, making them not just visually appealing but also emotionally resonant.
Rule of Thirds and Water Photography:
The Rule of Thirds is a fundamental compositional principle that applies seamlessly to water photography. Imagine dividing your frame into a 3×3 grid, both horizontally and vertically, creating nine equally sized rectangles. The points where these lines intersect are prime focal points.
Placing Key Elements:
Position the main elements of your water scene along the gridlines or at the points of intersection. For instance, align the horizon with one of the horizontal lines to create a balanced composition.
Creating Balance:
Utilize the Rule of Thirds to achieve balance in your water compositions. If you have a striking reflection in the water, position it along one of the gridlines to harmonize the visual elements in the frame.
Dynamic Compositions:
Embrace asymmetry by placing the primary subject off-center. This not only adheres to the Rule of Thirds but also introduces a dynamic quality to your water photographs.
Balancing Elements in Your Frame:
Balancing the elements within your frame is crucial to prevent your image from feeling cluttered or unbalanced. Water scenes often involve a combination of static and dynamic elements, and finding equilibrium is essential.
Foreground and Background Harmony:
Incorporate an interesting foreground element, such as rocks, seashells, or driftwood, to anchor your composition. Ensure that the background complements the foreground without overshadowing it.
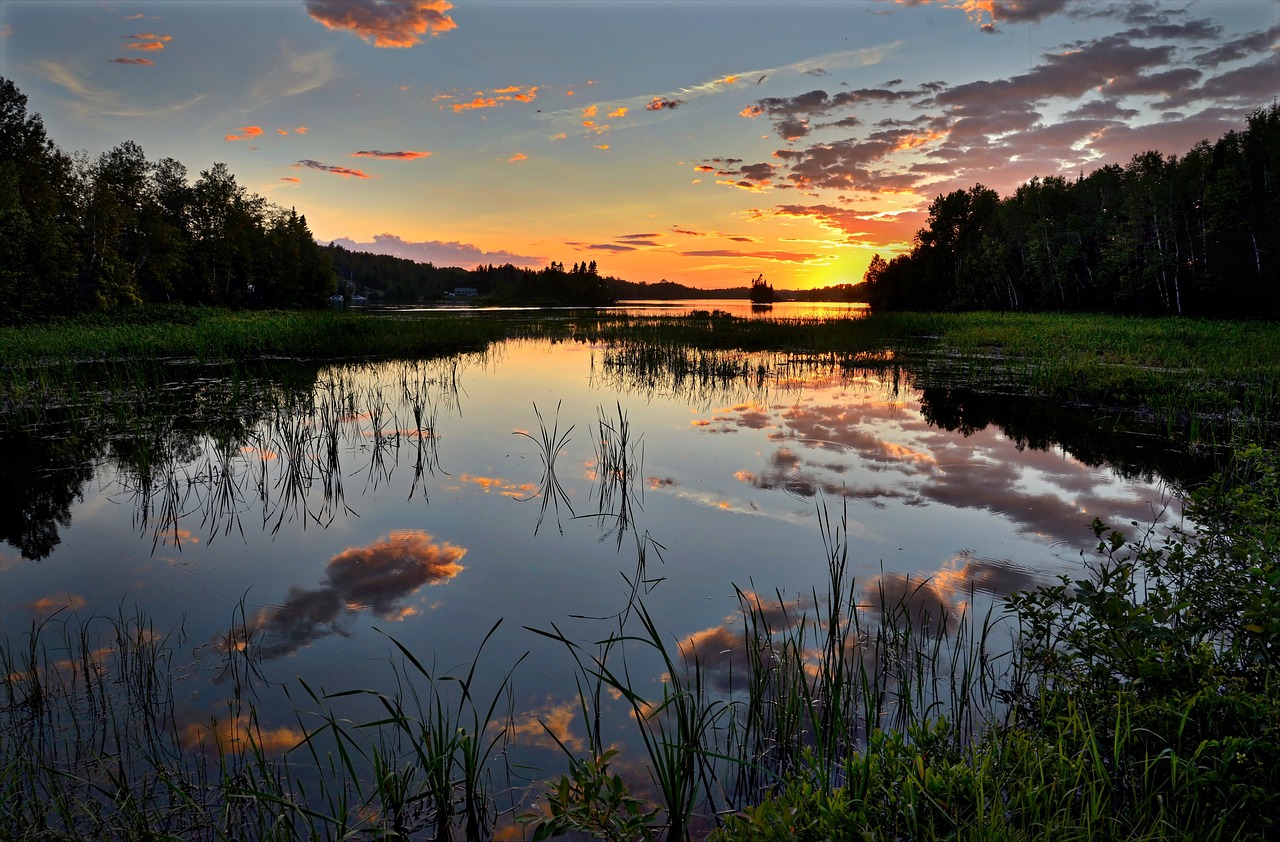
Symmetry and Reflections: Crafting Tranquil Compositions in Water Photography
In the captivating realm of water photography, harnessing the power of symmetry and reflections transforms your compositions into harmonious visual narratives. By intentionally seeking out symmetrical elements in water scenes—whether in the perfectly mirrored reflection of a landscape or the natural symmetry within the environment—you infuse your images with a sense of order and tranquility, inviting viewers into a serene and balanced visual experience.
Strategies for Incorporating Symmetry and Reflections:
Identify Symmetrical Elements:
Observe your surroundings and identify elements that exhibit symmetry. This could be a mirror-like reflection on a calm lake, the repetition of shapes in rippling water, or the balanced arrangement of objects along the water’s edge. Look for opportunities to highlight and emphasize these symmetrical elements.
Utilize Still Water Surfaces:
Seek out moments when the water surface is still and reflective. Calm lakes, ponds, or sections of rivers without significant turbulence are ideal for capturing clear and well-defined reflections. This provides a pristine canvas for creating symmetrical compositions.
Frame the Reflection:
Frame your composition to highlight the reflection as a central element. Pay attention to the placement of the horizon line and ensure that it aligns with the reflection for a seamless and visually pleasing effect. Use the water’s surface as a natural mirror to amplify the symmetry in your images.
Explore Architectural Elements:
Incorporate architectural elements near water bodies, such as bridges, buildings, or structures, that lend themselves to symmetrical compositions. Capture reflections of these elements in the water to enhance the visual impact and create a sense of balance.
Experiment with Natural Patterns:
Explore natural patterns in the environment, such as the repeating shapes of rocks, foliage, or the arc of a shoreline. Utilize these patterns to create a symmetrical balance in your compositions, adding a touch of tranquility and visual elegance to the scene.
Practical Tips for Achieving Symmetry:
Use a Tripod for Stability:
To achieve precise symmetry, especially when capturing reflections, use a tripod for stability. This ensures that your camera remains stationary, allowing you to align elements accurately and maintain symmetry in your compositions.
Employ Symmetry in Post-Processing:
In post-processing, fine-tune your images to enhance symmetry. Pay attention to details such as the alignment of the horizon, the positioning of key elements, and the overall balance of the composition. Tools like cropping and adjustments in software can refine and perfect the symmetry in your photographs.
Consider Reflections in Different Perspectives:
Experiment with reflections from various perspectives. Capture reflections from low angles to emphasize depth or explore reflections on textured surfaces like wet sand. Different perspectives can add diversity to your symmetrical compositions.
Contrast in Size and Shape:
Experiment with contrasting elements in terms of size and shape. A solitary boat against a vast expanse of water, for example, can create a compelling sense of scale and visual interest.
Using Leading Lines to Enhance Water Shots: Guiding the Viewer’s Gaze with Purpose
In the realm of water photography, the strategic use of leading lines emerges as a powerful and transformative technique. These lines, whether natural or man-made, act as visual pathways, guiding the viewer’s gaze through the frame and infusing your images with a dynamic sense of depth and movement. By incorporating leading lines into your compositions, you not only enhance the visual impact of water shots but also create a compelling narrative that draws the viewer into the captivating world you’ve captured.
Strategies for Effectively Using Leading Lines in Water Photography:
Follow the Natural Flow:
Observe the natural contours and flow of water elements in your scene. Rivers, streams, and waves often create inherent leading lines that can be used to guide the viewer’s gaze. Position yourself to align these lines with key elements in your composition, such as reflections, rocks, or distant horizons.
Utilize Shorelines and Coastal Features:
Shorelines and coastal features, including sandbars, cliffs, or jetties, present opportunities for incorporating leading lines. The convergence of the shoreline can serve as a powerful guide, drawing the viewer’s eye into the heart of your composition. Experiment with different angles to optimize the impact of these lines.
Explore Architectural Elements:
Incorporate man-made structures such as bridges, piers, or pathways into your water photography. These elements often introduce strong leading lines that complement the fluidity of water. Capture reflections of these structures on the water’s surface to enhance the visual impact.
Experiment with Long Exposures:
Long exposure photography can accentuate the effect of leading lines, especially in water scenes with flowing elements. The smooth, blurred motion of water adds a dynamic quality to the lines, creating a captivating interplay between stillness and movement.
Consider Foreground Elements:
Introduce foreground elements that naturally guide the viewer’s eye towards the main subject or focal point. Rocks, vegetation, or even the texture of the water’s surface can serve as effective foreground leading lines, enriching the overall composition.
Practical Tips for Enhancing Leading Lines in Water Shots:
Choose Appropriate Angles:
Experiment with different angles to maximize the impact of leading lines. Sometimes, a lower perspective can accentuate the lines’ prominence, while other situations may benefit from an elevated viewpoint. Test various angles to find the most compelling composition.
Mindful Composition and Balance:
Ensure that the leading lines contribute to a balanced and harmonious composition. Consider the overall framing, the placement of key elements, and the visual flow created by the lines. A well-composed image with purposeful leading lines enhances the viewer’s engagement.
Use Post-Processing to Emphasize Lines:
During post-processing, fine-tune your images to emphasize leading lines. Enhance contrast, adjust tones, or use subtle vignettes to draw attention to the lines and guide the viewer’s gaze. Be mindful not to overemphasize, but rather enhance the lines in a way that complements the overall mood.
Natural Lines:
Identify and utilize natural lines in your water scenes, such as shorelines, waves, or the course of a river. These lines draw the viewer into the image, creating a visual journey through the photograph.
Man-Made Structures:
Incorporate man-made structures like bridges, piers, or pathways along the water to introduce linear elements. These structures not only add interest but also serve as effective leading lines.
Curves and Flow:
Embrace the curves and flow of the water itself. A winding river or a meandering stream can naturally guide the viewer’s eyes, adding a sense of rhythm and harmony to your compositions.
Light is the essence of photography, and when it comes to water photography, the interplay of light and reflections adds a layer of complexity and beauty to your images. Mastering the nuances of light in different situations will elevate your water photography to new heights.
Golden Hours and Water Photography:
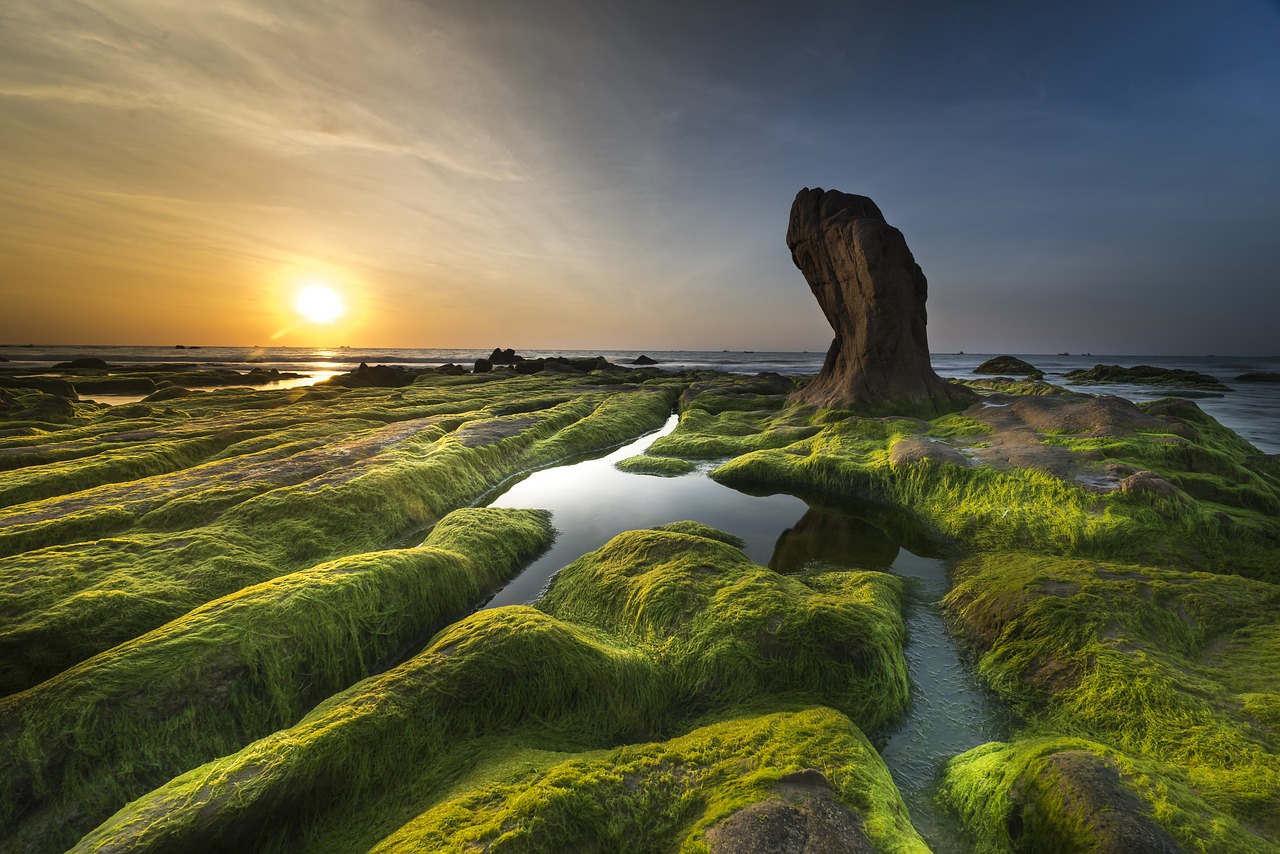
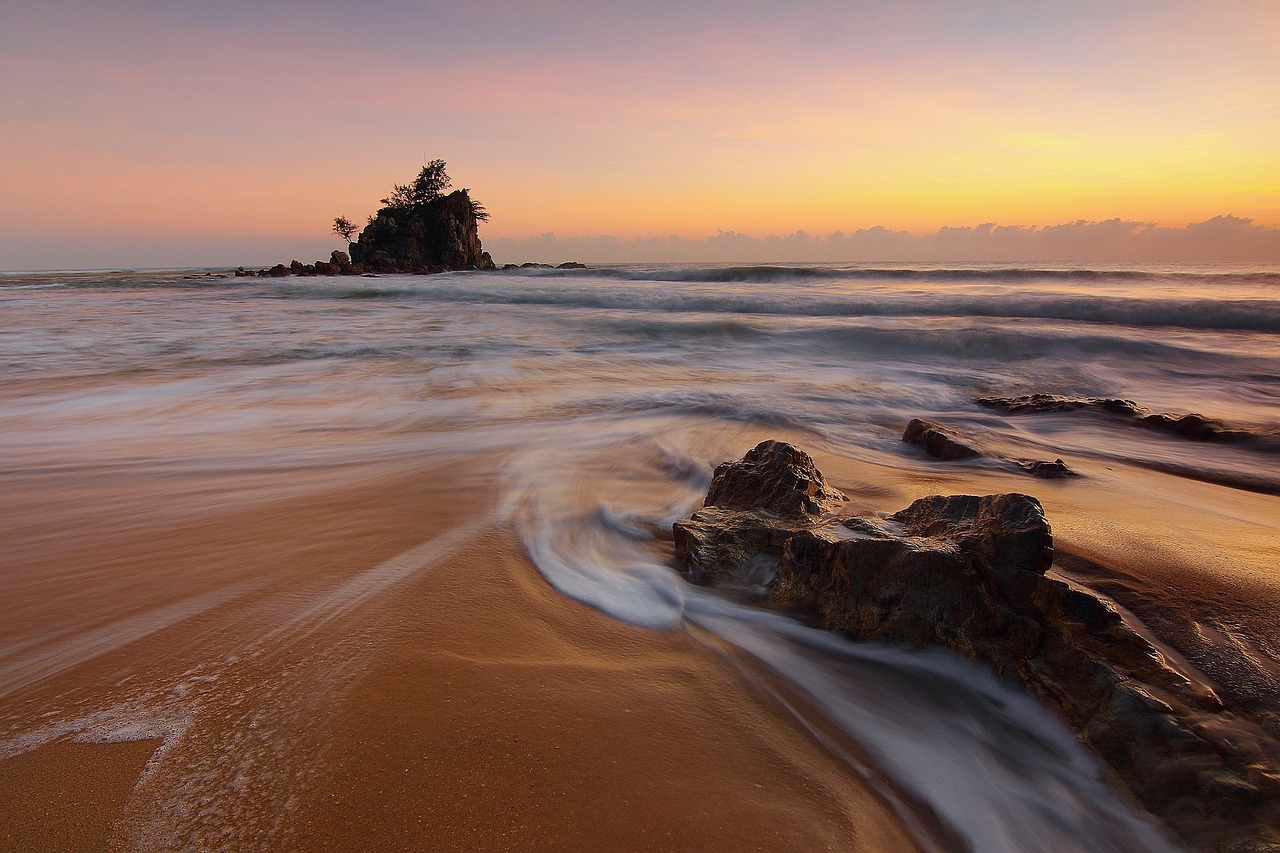
The magic of sunrise in water photography is unparalleled, offering a canvas painted with soft, warm hues that elevates your compositions to ethereal heights. As the sun graces the horizon during the golden hour, its low angle casts a gentle glow that enhances the textures of waves, creates long shadows, and adds a touch of enchantment to coastal scenes. Embracing the beauty of sunrise not only bathes your water photographs in a dreamy atmosphere but also unlocks the potential for capturing moments of serenity and awe.
Strategies for Capturing Sunrise Magic in Water Photography:
Timing is Key:
Arrive early to your chosen location to capture the unfolding beauty of sunrise. The moments leading up to and immediately after the sun breaks the horizon often yield the most magical lighting conditions. Be prepared to witness and capture the transition from predawn darkness to the soft glow of sunrise.
Explore Coastal Environments:
Coastal environments, with their dynamic waves, rocky shores, and expansive horizons, are particularly enchanting during sunrise. The low angle of the sun accentuates the textures of waves, casting long shadows and creating a captivating interplay of light and shadow.
Utilize Silhouettes and Shadows:
Leverage the soft morning light to create striking silhouettes and shadows. Experiment with capturing the outline of coastal elements, such as rocks, cliffs, or vegetation, against the warm backdrop of the rising sun. The contrast between dark silhouettes and the vibrant sunrise sky adds drama and depth to your compositions.
Long Exposures for Ethereal Effects:
Consider using long exposure techniques during sunrise to achieve ethereal effects with water. Smooth out the motion of waves, create a sense of mist around rocks or cliffs, and capture the serene, otherworldly beauty of the morning light reflecting on the water’s surface.
Pay Attention to Reflections:
Explore opportunities to capture reflections during sunrise. Calm water surfaces, such as lakes or ponds, provide ideal conditions for mirror-like reflections of the sky and surrounding landscape. The symmetrical beauty of reflections adds a layer of tranquility to your images.
Practical Tips for Photographing Sunrise Magic:
Use a Tripod for Stability:
To capture the subtle details and maintain image sharpness during low-light conditions, use a sturdy tripod. This ensures stability, especially if you’re exploring long exposure techniques or want to fine-tune your compositions with precision.
Experiment with White Balance:
Explore different white balance settings to enhance the warmth and mood of your sunrise photographs. Adjusting the white balance towards warmer tones (lower Kelvin values) can intensify the golden hues, creating a more magical and inviting atmosphere.
Capture the Changing Sky:
While focusing on the water and coastal elements, also pay attention to the changing colors and patterns in the sky. Sunrise brings a dynamic interplay of hues, from soft pinks and purples to vibrant oranges and reds. Include the evolving sky in your compositions for a more comprehensive representation of the magical moment.
Compose Mindfully:
Mindful composition is crucial during sunrise photography. Pay attention to the placement of key elements, the balance of the scene, and the overall flow of the composition. Be intentional in framing your shots to capture the essence of the magical sunrise.
Sunset Serenity in Water Photography: A Palette of Tranquil Beauty
As the day gracefully transitions into evening, water photography during sunset unveils a symphony of tranquility and visual splendor. The diminishing light bathes the scene in rich, vibrant colors, and the reflective nature of water intensifies the hues of the sky, giving rise to breathtaking seascapes and silhouettes. Capturing sunset serenity is an art that allows you to translate the tranquil beauty of these moments into timeless and evocative water photographs.
Strategies for Capturing Sunset Serenity in Water Photography:
Arrive in Advance:
Arrive at your chosen location well in advance to witness the gradual transition of light during the golden hour. This preparatory time allows you to scout for optimal compositions and be ready to capture the serene beauty as the sun begins its descent.
Explore Coastal Silhouettes:
Coastal environments provide a stunning backdrop for sunset photography. Silhouettes of cliffs, rocks, and shoreline vegetation against the vibrant hues of the setting sun create a compelling contrast. Position yourself strategically to capture the interplay between the dark silhouettes and the warm, glowing sky.
Focus on Reflections:
Leverage the reflective qualities of water to intensify the beauty of the sunset. Calm water surfaces, such as lakes, ponds, or still sections of rivers, serve as mirrors that amplify the colors of the sky. Capture the reflection of the sunset to add a layer of symmetry and ethereal beauty to your compositions.
Experiment with Long Exposures:
Explore long exposure techniques to smooth out the motion of waves and create a dreamy, serene atmosphere. This is particularly effective when photographing seascapes, where the rhythmic movement of waves under the warm hues of sunset adds a touch of magic to your images.
Include Elements in the Foreground:
Introduce interesting foreground elements, such as rocks, shells, or driftwood, to enhance the composition. The warm, golden light of sunset accentuates the textures of these elements, adding depth and visual interest to your water photographs.
Practical Tips for Photographing Sunset Serenity:
Use a Tripod for Stability:
To ensure stability and sharpness in your images, especially during lower light conditions, use a tripod. This allows you to experiment with longer exposures and maintain the clarity of your compositions.
Capture the Changing Sky:
Sunset is a dynamic event, and the colors in the sky evolve rapidly. Capture a series of shots to document the changing hues—from the warm tones of the golden hour to the soft pastels of twilight. This approach provides a comprehensive representation of the serene sunset atmosphere.
Adjust White Balance:
Experiment with white balance settings to fine-tune the color temperature of your images. Adjusting towards warmer tones enhances the richness of sunset colors, creating a more evocative and serene mood.
Frame with Purpose:
Mindful composition is essential in capturing sunset serenity. Pay attention to the placement of key elements, the balance of the scene, and the overall flow of the composition. Frame your shots with purpose to convey the tranquility and beauty of the moment.
Play of Shadows:
Experiment with the interplay of light and shadows during the golden hours. This dynamic contrast can emphasize textures in waves, reveal intricate details in reflections, and bring a sense of drama to your water compositions.
Utilizing Reflections to Add Depth:
Still Waters in Water Photography: Capturing Pristine Reflections
In the realm of water photography, seeking out calm and still waters unveils a canvas of pristine reflections, adding a touch of elegance and symmetry to your compositions. Lakes, ponds, and tide pools become perfect surfaces that mirror the surrounding environment, creating a visual poetry that captures the essence of tranquility. Embracing still waters allows you to elevate your images, as the undisturbed surfaces transform into mirrors, inviting viewers to explore the serenity and beauty of the captured moment.
Strategies for Capturing Pristine Reflections in Still Waters:
Choose the Right Location:
Scout for locations with naturally calm and still waters. Lakes, ponds, and tide pools are ideal settings that provide the perfect surfaces for capturing pristine reflections. The absence of strong currents or waves allows for clear and undisturbed reflections.
Visit During Tranquil Conditions:
Plan your shoots during times of low wind and minimal disturbance. Early mornings or late evenings often offer calm conditions, creating an atmosphere conducive to capturing still waters and their reflections in their most pristine form.
Utilize Symmetrical Elements:
Identify and utilize symmetrical elements in the surroundings. Trees, mountains, buildings, or other distinct features along the water’s edge can add symmetry to your compositions. Position yourself to align these elements with the reflective surface, creating a harmonious visual balance.
Experiment with Different Perspectives:
Explore different angles and perspectives to maximize the impact of reflections. Get low to the water’s surface to enhance the reflection’s prominence, or capture reflections from elevated viewpoints for a unique perspective. Experimentation allows you to discover the most captivating angles for pristine reflections.
Capture During Golden Hour:
Take advantage of the golden hour, the period shortly after sunrise or before sunset, when the warm, directional light enhances the beauty of reflections. The soft, angled sunlight adds a gentle touch to the water’s surface, enriching the colors and creating a serene atmosphere.
Practical Tips for Photographing Still Waters:
Use a Tripod for Stability:
Ensure image stability and clarity by using a tripod, especially in low-light conditions or when using longer exposures. A stable setup is crucial for capturing the fine details of reflections on still waters.
Mindful Composition:
Pay attention to composition and framing to enhance the visual impact of still waters. Position key elements, such as reflections or symmetrical features, within the frame to create a balanced and aesthetically pleasing composition.
Adjust White Balance:
Experiment with white balance settings to fine-tune the color temperature of your images. Adjusting towards warmer tones during the golden hour or cooler tones during twilight can enhance the mood and visual appeal of reflections on still waters.
Capture Details Beneath the Surface:
If photographing clear still waters, explore the details beneath the surface. Rocks, pebbles, or aquatic life can add an extra layer of interest to your reflections. Use polarizing filters to reduce glare and reveal more of the submerged details.
Creating Symmetry:
Use reflections to create symmetrical compositions. Align your camera to capture both the water’s surface and the reflected scene, emphasizing the mirrored beauty of the landscape.
Distorted Reflections in Water Photography: Embracing Playful Creativity
In the enchanting world of water photography, the playful nature of reflections in rippling water opens the door to a realm of artistic possibilities. By deliberately embracing the distortion of shapes and colors, you can create abstract effects that add a touch of creativity and whimsy to your images. Distorted reflections become a canvas for experimentation, allowing you to infuse your water photography with a dynamic and artistic flair.
Strategies for Embracing Distorted Reflections:
Capture Ripples and Waves:
Seek out water environments with natural ripples or waves. These dynamic elements introduce movement into the reflections, creating distortion that becomes a key feature of your compositions. Experiment with different shutter speeds to capture the level of distortion that aligns with your creative vision.
Utilize Windy Conditions:
Windy conditions on open bodies of water can introduce captivating distortions. Explore locations where wind creates ripples or small waves, transforming the reflective surface into a canvas of fluid shapes. The interplay between wind and water becomes a dynamic element in your compositions.
Experiment with Panning:
Experiment with panning techniques to intentionally introduce motion into your water photography. Move your camera along with the motion of the water, blurring the reflections and creating a painterly effect. This technique can add a sense of energy and abstraction to your images.
Explore Abstract Compositions:
Embrace the abstract potential of distorted reflections by focusing on shapes, patterns, and colors rather than detailed representations. Look for opportunities to capture reflections that break down into fragmented or kaleidoscopic compositions, inviting viewers to interpret the scene in unique ways.
Play with Light and Shadow:
Experiment with the interplay of light and shadow on rippling water. The distortion of reflections in varying light conditions can result in captivating contrasts and dynamic visual effects. Play with the angles of light to highlight certain elements and create a sense of drama in your compositions.
Practical Tips for Photographing Distorted Reflections:
Use a Fast Shutter Speed:
When capturing distorted reflections with motion, use a fast shutter speed to freeze the dynamic elements. This ensures that the distortion is captured with clarity, allowing you to control the level of abstraction in your images.
Adjust Focus and Depth of Field:
Experiment with focus and depth of field to selectively highlight certain areas of the distorted reflections. Consider using a shallow depth of field to isolate specific shapes or colors, creating a sense of depth and dimension in your compositions.
Embrace Post-Processing Creativity:
Use post-processing tools to further enhance the creative potential of distorted reflections. Adjusting contrast, saturation, and experimenting with color grading can elevate the abstract qualities of your images. Don’t be afraid to push the boundaries of traditional editing to achieve the desired artistic effects.
Seek Inspiration in Nature:
Observe the distortions created by natural elements, such as rocks or underwater structures, that contribute to reflections. Nature itself can provide unexpected and intriguing distortions that become focal points in your water photography.
Managing Harsh Light and Shadows:
Diffusing Harsh Light:
When faced with harsh midday sun, use natural elements like trees, cliffs, or clouds to diffuse and soften the light. This minimizes harsh shadows and highlights, allowing for more even exposure in your water photographs.
Contrast and Texture:
Emphasize the texture of water surfaces in harsh light conditions. The play of shadows on waves or ripples can add visual interest, creating a dynamic and textured look in your images.
n the realm of water photography, the technique of embracing silhouettes and shadows introduces a captivating interplay of light and darkness. By positioning subjects against the bright backdrop of water, you create dramatic and contrasting shapes that highlight the contours of your main focal points. This approach not only adds an element of mystery and intrigue to your compositions but also allows you to explore the dynamic relationship between subjects and the radiant canvas of water.
Strategies for Creating Silhouettes and Shadows:
Utilize Strong Backlighting:
Position your subjects in front of a bright water background, allowing the light to come from behind. This strong backlighting is crucial for creating silhouettes, as it casts the subjects into shadow and emphasizes their shapes against the luminous water.
Choose Distinctive Subjects:
Opt for subjects with recognizable and distinctive shapes. This could include individuals, wildlife, trees, or any elements that possess clear outlines. The goal is to create silhouettes that are easily identifiable and visually striking against the water backdrop.
Experiment with Sunset or Sunrise:
Capitalize on the golden hours, the moments shortly after sunrise or before sunset, when the warm, directional light enhances the contrast between subjects and the water. The low angle of the sun during these times intensifies the silhouette effect and adds a touch of warmth to your compositions.
Incorporate Reflections:
Explore compositions where the water surface reflects the silhouetted subjects. This adds an additional layer of visual interest and complexity to your images. Calm waters, such as lakes or ponds, are ideal for capturing crisp reflections that complement the silhouettes.
Consider Environmental Elements:
Integrate environmental elements into your silhouetted compositions. This could include features like rocks, cliffs, or vegetation that further enhance the contours and provide context to the scene. The combination of silhouettes and environmental elements creates a layered and visually rich narrative.
Practical Tips for Photographing Silhouettes and Shadows:
Meter for the Background:
When metering your exposure, focus on the bright water background to ensure that it is properly exposed. This results in subjects being rendered as dark silhouettes, creating a stark contrast between the foreground and background.
Use a Narrow Aperture:
Employ a narrow aperture (higher f-stop) to maintain sharpness and detail in the silhouetted subjects. This is particularly important when capturing intricate shapes or fine details against the water backdrop.
Frame with Purpose:
Pay attention to composition and framing to enhance the visual impact of silhouettes. Consider the placement of key elements, the balance of the scene, and the overall flow of the composition. Frame your shots with purpose to create a compelling narrative.
Experiment with Poses and Angles:
Encourage dynamic poses or experiment with different angles to capture interesting and varied silhouetted shapes. The play of shadows and contours can be further enhanced by the positioning and movement of your subjects.
Freezing or Blurring: Mastering Motion
The dynamic nature of water provides a canvas for expressing movement in various ways. Whether freezing the power of crashing waves or creating a dreamy, silk-like effect with long exposures, mastering motion in water photography adds depth and drama to your images.
Capturing the Power of Flowing Water:
Understanding the Flow:
Study the movement of water in the environment you’re photographing. Whether it’s a river, waterfall, or ocean waves, understanding the patterns and rhythms of the water’s flow is crucial.
Fast Shutter Speeds:
Use fast shutter speeds (1/500s or higher) to freeze the motion of fast-flowing water. This technique is ideal for capturing the crisp details and dynamic energy of waves crashing against rocks or the rushing flow of a river.
Focus on Texture:
When freezing water motion, focus on capturing the texture of the water. The individual droplets, splashes, and ripples contribute to the overall visual impact of the image.
Creating Silk-Like Effects with Long Exposures:
Choosing the Right Settings:
Set your camera to a slow shutter speed (several seconds to minutes) to capture the silky, smooth effect of flowing water. This technique is particularly effective when photographing waterfalls or gently moving streams.
Stabilizing Your Camera:
Use a sturdy tripod to eliminate camera shake during long exposures. This ensures the surrounding elements remain sharp while the flowing water transforms into a mesmerizing, ethereal blur.
Neutral Density Filters:
Employ neutral density (ND) filters to reduce the amount of light entering your lens, allowing for longer exposure times even in bright conditions. This is crucial for achieving extended shutter speeds without overexposing the image.
Using Fast Shutter Speeds for Crisp Action Shots:
Selecting Appropriate Shutter Speeds:
Determine the appropriate shutter speed based on the speed and intensity of the water movement. Fast shutter speeds (1/1000s or higher) are ideal for capturing dynamic action, such as water droplets in mid-air or the splash of waves against a rocky shore.
Continuous Shooting Mode:
Utilize your camera’s continuous shooting mode to capture a series of images in rapid succession. This is especially useful for fast-paced water scenes, ensuring you don’t miss the decisive moment.
Autofocus Considerations:
Use continuous autofocus mode to track moving water, ensuring your camera maintains sharp focus on the rapidly changing elements within the scene.
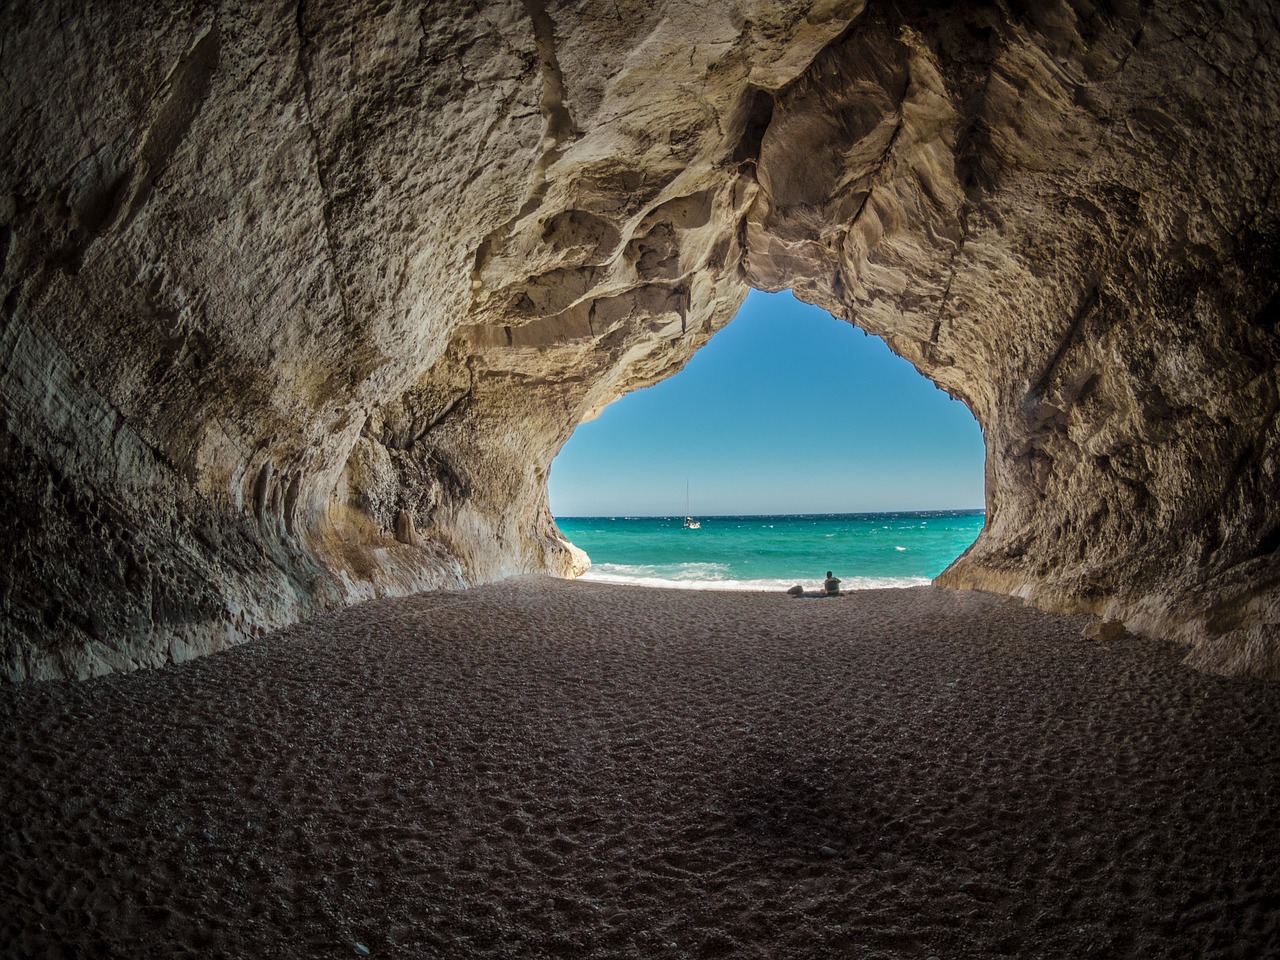
Choosing the right location is paramount in water photography, as different environments offer unique opportunities and challenges. From the vast openness of seascapes to the intimate beauty of lakes and rivers, each location presents a canvas for capturing the diverse expressions of water.
Coastal Photography: Seascapes and Shorelines:
Timing Tides and Sunsets:
Plan your coastal photography around the tides, as low tide can reveal interesting textures and formations, while high tide provides dynamic waves crashing against rocks. Combine this with the golden hours during sunrise or sunset to capture the magical hues and reflections on the water.
Foreground Elements:
Introduce foreground elements such as rocks, shells, or driftwood to add depth and interest to your coastal compositions. These elements not only anchor the scene but also provide a sense of scale against the vastness of the sea.
Long Exposures for Motion:
Experiment with long exposures to create a sense of movement in the waves. This technique can transform crashing waves into a silky, misty spectacle, adding a touch of drama to your coastal photographs.
Capturing the Majesty of Waterfalls:
Choosing the Right Time:
Visit waterfalls during overcast days or in the early morning or late afternoon to avoid harsh sunlight and capture even, diffused lighting. This helps bring out the details in the water and surrounding foliage.
Utilizing Wide-Angle Lenses:
Use wide-angle lenses to capture the grandeur of waterfalls and their surroundings. This allows you to include the entire scene, from the rushing water to the lush vegetation and any surrounding features.
Balancing Exposure:
Pay careful attention to exposure, especially when dealing with the contrast between the bright waterfall and darker areas. Bracketing or using graduated neutral density filters can help balance the exposure and retain detail in both highlight and shadow areas.
Finding Inspiration in Lakes and Rivers:
Lakes, with their serene surfaces, offer a picturesque canvas for capturing reflections that elevate the visual allure of your water photography. Particularly during calm weather conditions, the mirrored surface of a lake becomes a captivating reflection pool, enhancing the visual impact of surrounding elements such as mountains, trees, or other natural features. This technique not only adds a sense of tranquility to your compositions but also invites viewers to immerse themselves in the mesmerizing interplay between the mirrored world and the calm waters.
Strategies for Capturing Reflections on Calm Waters:
Choose Ideal Weather Conditions:
Opt for shooting on days with minimal wind or turbulence to ensure a calm lake surface. Tranquil weather conditions are essential for creating clear and undisturbed reflections. Early mornings or late evenings often provide the calmest atmospheres.
Position Yourself Strategically:
Find the optimal vantage points to position yourself in alignment with key elements you wish to capture in the reflection. Consider the angle of the sun and the direction of the light to enhance the clarity and visibility of the mirrored images on the calm waters.
Explore Symmetrical Compositions:
Leverage the symmetry of reflections to create visually striking compositions. Frame your shot to include both the actual elements (mountains, trees, etc.) and their reflections in a symmetrical manner. This approach adds a sense of balance and harmony to your images.
Utilize Long Focal Lengths:
Experiment with longer focal lengths to bring distant elements closer and enhance their presence in the reflection. This technique is particularly effective when capturing reflections of mountains or expansive landscapes, allowing you to showcase intricate details with clarity.
Consider Sunrise or Sunset:
Take advantage of the golden hours, the moments shortly after sunrise or before sunset, to add warmth and a soft glow to your reflections. The low angle of the sun during these times accentuates the beauty of the mirrored landscape and enhances the overall mood of your photographs.
Practical Tips for Photographing Reflections on Calm Waters:
Use a Polarizing Filter:
Employ a polarizing filter to reduce glare and enhance the clarity of reflections. This accessory allows you to control the intensity of reflections on the water’s surface, resulting in more vibrant and detail-rich images.
Stabilize Your Camera:
Ensure stability by using a tripod, especially in low-light conditions or when capturing reflections with longer exposures. A stable setup is crucial for maintaining sharpness and clarity in your images.
Adjust Exposure for Balanced Tones:
Pay attention to the exposure settings to achieve balanced tones in both the reflected and non-reflected elements. Adjust your exposure to ensure that details are visible in both the mirrored surface and the actual scene.
Experiment with Different Perspectives:
Explore different perspectives and angles to discover the most captivating compositions. Consider getting low to the water’s surface for a more immersive reflection or experiment with elevated viewpoints for a unique vantage point.
Navigating River Dynamics:
Photographing rivers often involves working with dynamic and fast-flowing water. Look for interesting features such as rapids, cascades, or meandering bends in the river to add visual interest to your compositions.
Seasonal Variations:
Explore the same lake or river throughout different seasons to capture the changing colors and moods. From the vibrant foliage of autumn to the serene snow-covered landscapes of winter, each season brings a unique perspective to your water photography.
The ever-changing elements of weather and atmosphere play a pivotal role in water photography, offering opportunities to capture dramatic and evocative shots. From leveraging different weather conditions to adding an air of mystery with mist and fog, and turning rain and puddles into artistic expressions, embracing the elements can elevate your water photography to new heights.
Leveraging Weather Conditions for Dramatic Shots:
Dramatic Storms and Clouds:
Stormy weather, with its dramatic clouds and changing light, can create captivating scenes. Look for moments when sunlight breaks through storm clouds, casting dynamic patterns on the water, or capture the power of waves during a tempest.
Contrasting Light and Shadows:
Take advantage of the contrast between light and shadows that often accompanies changing weather. Sunbreaks after rain showers, for example, can illuminate water surfaces in a way that adds depth and visual interest to your compositions.
Rainbows and Reflections:
After rain, search for rainbows over bodies of water. The juxtaposition of vibrant rainbows against a moody sky or reflected in a puddle can yield stunning and emotionally charged images.
Mist and Fog: Adding Mystery to Water Photography:
In the enchanting realm of water photography, the early morning hours unveil a mystique that transcends the ordinary. As mist delicately rises from water surfaces, a captivating atmospheric phenomenon takes shape, lending an ethereal quality to your images. This mystical dance of mist softens details, adds a touch of mystery, and transforms the landscape into a canvas of enchantment. Capturing the serene beauty of mist during the early morning not only showcases the transient nature of these moments but also invites viewers to immerse themselves in the dreamlike atmosphere you’ve expertly captured.
Strategies for Capturing Early Morning Mystique:
Arrive Before Sunrise:
Plan your photography sessions to coincide with the moments before sunrise. This is when the cool air meets the warmer water, creating ideal conditions for mist formation. Arriving early ensures that you can witness the gradual unveiling of misty landscapes.
Choose Suitable Water Environments:
Select water environments that are conducive to mist formation. Lakes, rivers, and ponds are excellent choices, especially those surrounded by natural elements such as trees or mountains. Bodies of water with minimal disturbances and reflective surfaces enhance the ethereal effect.
Frame with Atmospheric Elements:
Frame your compositions to include atmospheric elements such as trees, hills, or distant landscapes. The rising mist interacts with these elements, adding depth and dimension to your images. Explore compositions that showcase the interplay between the ethereal mist and the surrounding environment.
Experiment with Different Perspectives:
Explore various angles and perspectives to capture the mystique of rising mist. Get low to the water’s surface for a more immersive view or experiment with elevated viewpoints to observe how mist drapes over the landscape. Different perspectives allow you to discover the most captivating compositions.
Use Backlighting for Drama:
Experiment with backlighting to add a sense of drama to your misty scenes. Position yourself so that the rising mist is backlit by the soft morning light. This not only accentuates the mist but also creates a subtle glow that enhances the dreamlike atmosphere.
Practical Tips for Photographing Early Morning Mystique:
Employ a Telephoto Lens:
Use a telephoto lens to isolate specific areas of mist and create a more intimate view of the landscape. This allows you to focus on details, such as individual trees or pockets of mist, while maintaining a sense of mystery in the wider composition.
Maintain a Low ISO for Clarity:
Keep your ISO low to ensure clarity and reduce noise, especially in low-light conditions. This is crucial for capturing the subtle details of mist and maintaining the overall quality of your images.
Experiment with Different Focal Lengths:
Experiment with different focal lengths to achieve varying perspectives. Wide-angle lenses can capture expansive misty landscapes, while longer focal lengths can isolate specific details and create a more intimate, atmospheric view.
Adjust White Balance for Mood:
Experiment with white balance settings to convey the mood of the early morning. Warmer tones (lower Kelvin values) can enhance the soft, golden glow of sunrise, while cooler tones (higher Kelvin values) may evoke a more mysterious and ethereal atmosphere.
Capture the Transient Moments:
Be mindful of the transient nature of misty conditions. The rising mist evolves rapidly, creating ever-changing patterns and atmospheres. Capture a series of shots to document the unfolding beauty and nuances of the misty morning.
Silhouettes and Shadows:
Use mist and fog to create silhouettes and shadows. Objects partially obscured by mist can evoke a dreamlike quality, allowing you to play with the viewer’s perception and imagination.
Layers and Depth:
Leverage mist and fog to enhance the sense of depth in your compositions. Elements that recede into the distance become increasingly muted, creating layers that add dimension and intrigue to your water photographs.
Rain and Puddles: Turning Adversity into Art:
Raindrop Textures:
Embrace rainy days as an opportunity to capture the texture of raindrops on water surfaces. Close-up shots of rain hitting puddles or creating ripples in a pond can result in visually compelling and detailed images.
Reflective Surfaces:
Explore reflective surfaces created by rain-soaked streets or puddles. Urban scenes transformed by rain offer unique opportunities for capturing reflections, creating a blend of cityscape and water elements in your photographs.
Embracing Adversity:
Instead of avoiding adverse weather conditions, embrace them. Rain, mist, and fog can add mood and emotion to your water photography, turning ordinary scenes into extraordinary visual narratives.
Capturing the enchanting world beneath the surface requires specialized techniques and equipment. From understanding the basics of underwater photography to selecting the right gear and achieving crystal-clear images, mastering the art of capturing the submerged realm opens up a realm of possibilities.
Basics of Underwater Photography:
Understanding Light and Color Absorption:
Light behaves differently underwater, with colors diminishing as you descend. Reds and oranges are the first to disappear. Understanding how light and color are absorbed by water is crucial for achieving accurate and vibrant underwater images.
Dealing with Buoyancy:
Achieving neutral buoyancy is essential to avoid disturbing the marine environment and capturing clear shots. Practice maintaining buoyancy control to navigate effortlessly and minimize the impact on delicate underwater ecosystems.
Working with Currents:
Be aware of underwater currents, as they can affect your stability and the movement of aquatic subjects. Plan your shots, taking currents into account to position yourself for optimal compositions.
Choosing the Right Equipment for Underwater Shots:
Waterproof Camera Housing:
Invest in a high-quality waterproof housing compatible with your camera. This protective casing allows you to bring your camera safely underwater, providing full access to controls while keeping your equipment dry.
Underwater Strobes or Lights:
Use external strobes or continuous lights designed for underwater photography to counteract the loss of color and contrast caused by water absorption. Proper lighting is essential for revealing the true colors and details of underwater subjects.
Wide-Angle Lenses:
Opt for wide-angle lenses to capture expansive underwater scenes and marine life. Wide-angle lenses help minimize the distortion caused by water and allow you to include more of the underwater environment in your compositions.
Macro Lenses for Small Subjects:
For close-up shots of small marine life and intricate details, use macro lenses. These lenses enable you to focus on the minute features of underwater subjects, from tiny seahorses to colorful nudibranchs.
Tips for Achieving Crystal-Clear Underwater Images:
Control Backscatter:
Backscatter, caused by particles in the water reflecting light back into the lens, can degrade image quality. Position your lights to minimize backscatter, and avoid shooting in areas with high particulate concentration.
Maintain Proper White Balance:
Set the white balance manually or use custom white balance settings to counteract the color cast caused by water. This ensures that your underwater images accurately represent the vibrant colors of marine life.
Shoot at the Right Depth:
Adjust your shooting depth to maximize available light. As natural light diminishes with depth, staying within the optimal range allows you to capture well-lit and clear underwater images without excessive noise.
Patience and Practice:
Underwater photography requires patience and practice. Experiment with different settings, compositions, and lighting techniques. Familiarize yourself with your equipment and hone your skills to capture stunning images of the underwater world.
Post-processing is the final stage in crafting compelling water photographs. By enhancing water details, managing imperfections, and adding the finishing touches, you can elevate your images to their full potential, ensuring they resonate with your vision and connect with your audience.
Enhancing Water Details in Post-Production:
Adjusting Contrast and Saturation:
Fine-tune contrast and saturation to enhance the details in your water photographs. Adjust these settings judiciously to bring out the texture of waves, emphasize reflections, and intensify the colors inherent in water scenes.
Clarity and Sharpness:
Apply subtle clarity adjustments to enhance mid-tone contrast without sacrificing a natural look. Additionally, use sharpening tools to bring out the crisp details in water droplets, waves, and other intricate elements.
Selective Color Adjustments:
Make selective color adjustments to emphasize specific hues in your water images. This can be particularly effective in highlighting the various shades of blue in oceans or enhancing the warmth of sunset reflections on water surfaces.
Dealing with Water Stains and Reflections:
Spot Removal and Healing Tools:
Use spot removal and healing tools to address water stains, specks, or unwanted elements on the water’s surface. These tools allow you to seamlessly eliminate distractions without compromising the integrity of the image.
Reducing Glare and Highlights:
Tone down excessive glare and highlights, especially in reflective surfaces. Gradual adjustments to exposure and highlight settings can help manage bright spots and bring balance to your water photographs.
Managing Distortions in Reflections:
Correct distortions or irregularities in reflections caused by the water’s surface. Use perspective correction tools to align and enhance reflections, ensuring they contribute positively to the overall composition.
Adding the Finishing Touch to Your Water Photographs:
Vignetting for Focus:
Apply subtle vignetting to draw attention to the center of your image. This technique can help emphasize the main water feature, guiding the viewer’s gaze to the focal point of your composition.
Fine-Tuning Composition:
Use post-processing tools to fine-tune your composition. Crop or straighten your image to ensure a balanced and harmonious visual flow, allowing the water elements to take center stage.
Creative Filters and Effects:
Experiment with creative filters and effects to add a unique touch to your water photographs. Consider applying soft focus, color grading, or subtle textures to impart a distinctive style that complements the mood of the scene.
Creating a Cohesive Look:
Maintain a cohesive look across a series of water photographs. Consistent color grading, toning, and style choices contribute to a visual narrative that ties your collection together, enhancing the overall impact.
Water, with its ever-changing nature and captivating qualities, provides a rich canvas for storytelling in photography. By creating emotional connections, using water as a narrative element, and building thematic series, you can weave compelling stories that go beyond visual aesthetics, resonating with your audience on a deeper level.
Creating Emotional Connections in Water Photography:
Evoke Emotions through Composition:
Craft compositions that evoke specific emotions. A lone figure standing by the shore, crashing waves during a storm, or serene reflections in a calm lake—all can serve as powerful visual elements that resonate emotionally with viewers.
Focus on Human Elements:
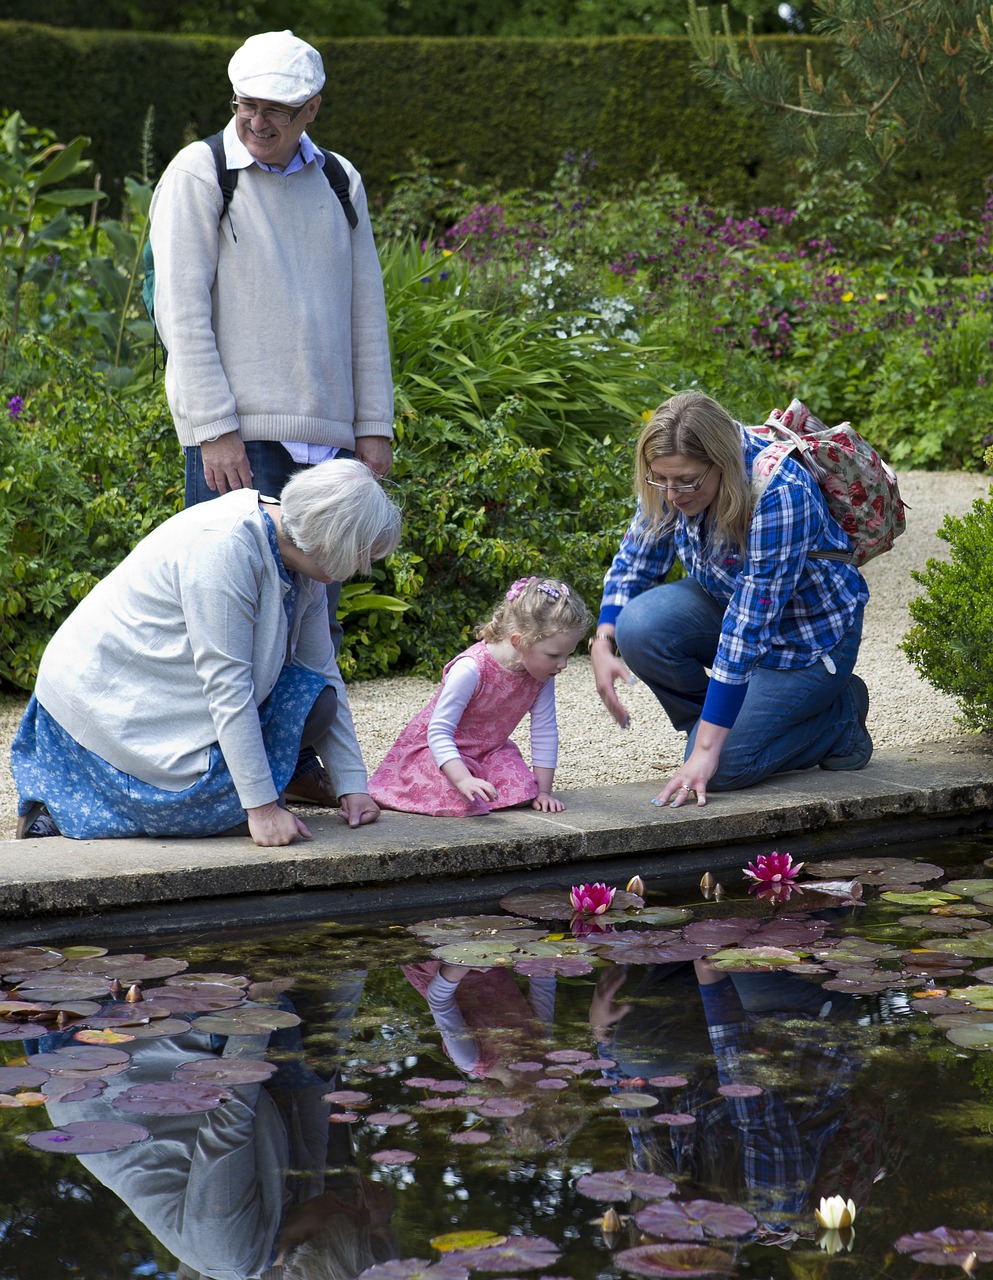
Integrate human elements into your water compositions to enhance emotional connections. Candid shots of people interacting with water—whether it’s joyous laughter, contemplative moments, or expressions of awe—add a relatable and emotional dimension to your storytelling.
Color Psychology in Water Scenes:
Consider the psychological impact of colors in water scenes. Cool blues and greens can convey tranquility, while warm tones may evoke feelings of comfort or nostalgia. Deliberate color choices contribute to the emotional tone of your water photographs.
Using Water as a Narrative Element:
Symbolism in Water Elements:
Leverage the symbolic nature of water to convey deeper meanings. Water can represent renewal, transformation, or the passage of time. Integrate these symbolic elements into your compositions to add layers of narrative complexity.
Telling Environmental Stories:
Use water as a storytelling device to raise awareness about environmental issues. Documenting polluted waterways, melting glaciers, or drought-stricken landscapes can serve as a powerful visual narrative that prompts reflection and action.
Capturing Life Cycles:
Document the life cycles associated with water, from the birth of a river to its convergence with the sea. By showcasing these natural progressions, you tell a visual story that transcends individual moments, providing viewers with a sense of continuity and connection.
Building Series and Projects Around Water Themes:
Exploring Varied Water Environments:
Build a series that explores different water environments, from oceans and rivers to lakes and puddles. This diversity not only showcases your versatility as a photographer but also allows for a comprehensive exploration of water’s various forms.
Seasonal Perspectives:
Develop projects that capture water through different seasons. Winter ice formations, spring rain showers, summer beach scenes, and autumn reflections offer a range of visual possibilities and thematic coherence within a series.
Cultural and Societal Perspectives:
Create series that delve into the cultural and societal significance of water. Documenting rituals, celebrations, or daily life associated with water in different communities provides a rich tapestry of stories that highlight the interconnectedness of humans and this vital element.
Narratives Across Time:
Construct narratives that span across time, telling stories of change, resilience, or continuity. Historical water features juxtaposed with modern developments or recurring natural events can illustrate the evolving relationship between societies and water.
The dynamic nature of water photography often presents challenges that require adaptability and creative problem-solving. From dealing with unpredictable elements to troubleshooting common issues, embracing the learning process and turning mistakes into opportunities are integral parts of mastering the art of capturing water.
Dealing with Unpredictable Elements in Water Photography:
Changing Weather Conditions:
Challenge: Weather can be unpredictable, affecting lighting and overall conditions.
Solution: Monitor weather forecasts and plan your shoots accordingly. Embrace changing weather as an opportunity to capture diverse moods, from stormy drama to the soft hues of a clearing sky.
Unpredictable Water Movement:
Challenge: Fast-changing water patterns can make it challenging to capture desired compositions.
Solution: Study the behavior of water in different environments. Patience is key; wait for the right moment to capture the desired motion. Utilize burst mode to ensure you don’t miss the perfect shot.
Uncooperative Wildlife:
Challenge: Wildlife in water scenes may not always cooperate, making it difficult to capture specific moments.
Solution: Be patient and observant. Anticipate the behavior of aquatic life and position yourself accordingly. Use longer lenses for wildlife photography and be prepared to adapt to unexpected movements.
Troubleshooting Common Water Photography Issues:
Dealing with Water Drops on Lens:
Issue: Water droplets on the lens can distort or obscure the image.
Solution: Keep a lens cloth or microfiber towel handy to wipe off water droplets between shots. Consider using a lens hood or rain cover in wet conditions.
Managing Reflections and Glare:
Issue: Excessive reflections and glare can affect the clarity of your water photographs.
Solution: Adjust your shooting angle to minimize reflections. Use a polarizing filter to reduce glare and enhance colors. Experiment with different angles and positions to find the optimal composition.
Balancing Exposure in High-Contrast Scenes:
Issue: High-contrast scenes, such as bright sunlight on water, can result in overexposed or underexposed areas.
Solution: Use graduated neutral density filters to balance exposure in high-contrast situations. Bracket your shots to capture a range of exposures and blend them in post-processing if necessary.
Learning from Mistakes and Embracing Surprises:
Reviewing and Analyzing Mistakes:
Approach: Instead of viewing mistakes as setbacks, see them as opportunities for growth.
Action: Regularly review your images, paying attention to areas where you faced challenges or made mistakes. Understand what went wrong and consider how you can improve in similar situations.
Embracing Unexpected Results:
Approach: Embrace the unexpected outcomes that can arise in water photography.
Action: Sometimes, the best shots come from unexpected moments or mistakes. Learn to appreciate and build upon these surprises, as they can lead to unique and artistic photographs.
Continuous Learning and Adaptation:
Approach: Water photography is a continuous learning process.
Action: Stay curious and open to experimentation. Adapt your techniques based on the challenges you face. Attend workshops, seek feedback, and continually refine your skills to overcome new challenges that arise.
Creating a portfolio of your water photography is a powerful way to showcase your skills, style, and the diverse beauty of water. From curating a collection of your best images to showcasing your unique style and sharing your work through various platforms, building a portfolio is a strategic step in establishing your presence in the world of water photography.
Curating a Collection of Your Best Water Photographs:
Selecting a Theme or Concept:
Identify a theme or concept that ties your water photographs together. Whether it’s capturing different water environments, exploring a specific color palette, or telling a narrative, a cohesive theme adds depth and continuity to your portfolio.
Showcasing Technical Proficiency:
Include a variety of images that demonstrate your technical proficiency. Showcase your ability to freeze motion, capture long exposures, and handle challenging lighting conditions. A well-rounded portfolio highlights your versatility as a water photographer.
Emphasizing Composition and Creativity:
Choose images that not only showcase technical skill but also emphasize strong composition and creative flair. Highlight your ability to tell stories, evoke emotions, and capture the unique essence of water scenes through your artistic vision.
Showcasing Your Unique Style in Water Photography:
Consistent Editing and Post-Processing:
Develop a consistent editing style that ties your water images together. Whether it’s a particular color grading, tonal preferences, or a signature approach to enhancing details, a cohesive editing style contributes to a recognizable and unique visual identity.
Distinctive Perspectives and Angles:
Showcase a variety of perspectives and angles that reflect your unique viewpoint. Experiment with different compositions, focal lengths, and framing to bring out your individual style in capturing water scenes.
Developing a Signature Look:
Develop a signature look that sets your water photography apart. This could involve a preference for certain types of water environments, a distinct approach to capturing motion, or a particular emphasis on storytelling elements. Consistency in your work contributes to the development of your recognizable style.
Sharing Your Work: Online Platforms and Exhibitions:
Online Portfolio Websites:
Create a dedicated online portfolio using platforms like Adobe Portfolio, Squarespace, or other photography-focused websites. Ensure that your portfolio is easy to navigate, visually appealing, and provides context for each image.
Social Media Platforms:
Share your water photography on social media platforms such as Instagram, Flickr, or 500px. Utilize appropriate hashtags and engage with the photography community to increase visibility and connect with fellow enthusiasts.
Photography Exhibitions and Galleries:
Explore opportunities to showcase your work in physical exhibitions or galleries. Local art shows, photography festivals, and community events provide platforms to display your water photography to a broader audience.
Collaboration and Networking:
Collaborate with other photographers, participate in online communities, and attend photography events to network with fellow artists. Building connections can lead to opportunities for joint exhibitions, features, and collaborations that expand the reach of your portfolio.
Water photography offers a unique opportunity to engage with and showcase the beauty of natural environments. However, it also comes with a responsibility to protect and preserve these delicate ecosystems. By adhering to ethical principles, respecting the environment, raising awareness, and being a responsible water photographer, you can contribute to the conservation of water-related ecosystems.
Respecting the Environment: Leave No Trace Principles:
Minimize Your Impact:
Practice the “Leave No Trace” principles to minimize your impact on water environments. Avoid trampling on delicate vegetation, disturbing wildlife, or leaving behind any waste. Leave the environment as you found it to preserve its natural beauty.
Stay on Designated Paths:
Stick to designated paths and trails to prevent soil erosion and disturbance to habitats. Avoid creating new paths or disturbing fragile ecosystems, especially in coastal areas or around bodies of water with sensitive flora and fauna.
Dispose of Waste Properly:
Pack out all of your waste, including packaging, and dispose of it properly. Avoid littering or leaving any items behind. Consider participating in cleanup efforts to remove litter that may have been left by others.
Raising Awareness Through Water Photography:
Tell Conservation Stories:
Use your water photography to tell stories that highlight the importance of conservation. Showcase the beauty of pristine environments, but also document the threats and challenges these ecosystems face, such as pollution, climate change, or habitat destruction.
Educate Viewers:
Provide informative captions or accompanying text with your images to educate viewers about the ecosystems and species depicted. Share information about the ecological significance of the water bodies you photograph and the importance of preserving them.
Collaborate with Conservation Organizations:
Partner with conservation organizations to amplify your impact. Contribute your images to campaigns, projects, or initiatives that focus on water conservation. Collaborative efforts can leverage your photography for a broader positive influence.
Being a Responsible Water Photographer:
Respect Wildlife and Habitats:
Maintain a safe distance from wildlife to avoid causing stress or disturbance. Use long lenses for wildlife photography to capture images without intruding on their natural behavior. Avoid disrupting nesting or breeding areas.
Obey Regulations and Guidelines:
Familiarize yourself with and adhere to local regulations and guidelines for photographing in specific water environments. Some areas may have restrictions to protect sensitive ecosystems, nesting grounds, or cultural sites.
Lead by Example:
Be a role model for responsible water photography. Demonstrate ethical behavior and conservation practices in your actions, interactions with the environment, and how you share your work. Encourage others to follow ethical guidelines.
Support Conservation Initiatives:
Contribute to conservation efforts through financial support or volunteering your time. Allocate a portion of the proceeds from your water photography to organizations working towards the preservation of water ecosystems.
As you conclude your journey in water photography, take a moment to reflect on the path you’ve traveled and the experiences you’ve gained. From understanding the essence of water photography to mastering the technical aspects, storytelling, and ethical considerations, your journey has been a dynamic exploration of creativity and skill.
Reflecting on Your Journey in Water Photography:
Celebrate Achievements and Growth:
Acknowledge and celebrate the achievements and growth you’ve experienced throughout your journey. Whether it’s mastering a challenging technique, capturing a memorable moment, or successfully conveying a narrative, each step has contributed to your development as a water photographer.
Learn from Challenges:
Consider the challenges you faced as valuable learning opportunities. Each obstacle, mistake, or unexpected turn has provided insights and lessons that contribute to your resilience and adaptability as a photographer.
Appreciate the Beauty of Water:
Reflect on the beauty and diversity of water that you’ve had the privilege to capture. From serene lakeshores to dynamic seascapes, water photography has allowed you to explore the many facets of this essential element.
Continuing to Evolve and Master the Craft:
Embrace a Lifelong Learning Mentality:
Recognize that the journey in water photography is ongoing. Embrace a mindset of lifelong learning, staying curious, and continually seeking new challenges and techniques to refine your craft.
Experiment with New Ideas:
Continue to experiment with new ideas and approaches. Explore different water environments, techniques, and styles to keep your photography fresh and evolving. Embracing creativity and experimentation leads to innovation in your work.
Stay Connected to the Photography Community:
Stay connected to the photography community, both locally and globally. Share your experiences, learn from others, and contribute to the collective knowledge of water photography. Networking with fellow enthusiasts provides inspiration and support.
Contribute to Conservation Efforts:
Use your influence as a water photographer to contribute to conservation efforts. Advocate for the protection of water ecosystems, raise awareness through your images, and consider contributing your work to projects that support environmental preservation.
Inspire Others:
Inspire others to appreciate and care for the beauty of water. Whether through exhibitions, online platforms, or educational initiatives, share your passion for water photography to foster a deeper connection between people and the natural world.